XAML 布局在 WP7.5 中没有 TextWrapping 内容
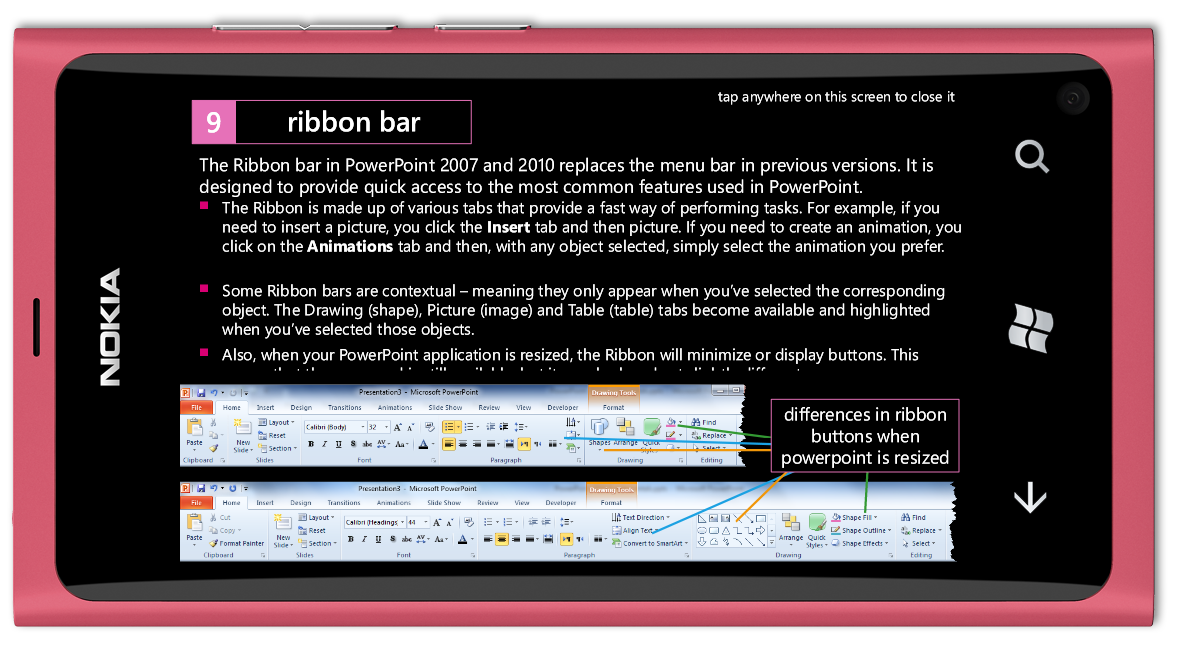
我在 Windows Phone 7.5 的 Silverlight 中遇到了一些 XAML 布局的奇怪问题。基本上,我使用我自己的项目符号点在画布的网格中创建多个文本框。问题是第一个要点(见下文)有一个扩展的文本框,没有明显的原因。看起来它是 TextWrapping 没有文本。请参阅第一个项目符号点下方的间距。您还会注意到,这会截断第三个项目符号上的一些文本:
INCORRECT LAYOUT:

这是 < 的代码code>
<Canvas Canvas.Left="20.21" Canvas.Top="66" Width="775.96" Height="224.17">
<Grid Canvas.Top="3.6" Canvas.Left="7.2" Width="762.06" Height="216.97">
<Grid VerticalAlignment="Top">
<Grid.RowDefinitions>
<RowDefinition Height="Auto" />
<RowDefinition Height="Auto" />
<RowDefinition Height="Auto" />
<RowDefinition Height="Auto" />
</Grid.RowDefinitions>
<Grid Grid.Row="0">
<TextBlock LineHeight="21.6" LineStackingStrategy="BlockLineHeight" TextWrapping="Wrap" TextAlignment="Left" Foreground="#FFFFFF" FontFamily="Segoe WP" FontSize="18">
<Run Text="The Ribbon bar in PowerPoint 2007 and 2010 replaces the menu bar in previous versions. It is designed to provide quick access to the most common features used in PowerPoint." />
</TextBlock>
</Grid>
<Grid Grid.Row="1" Margin="0 0 0 6">
<Grid.ColumnDefinitions>
<ColumnDefinition Width="0" />
<ColumnDefinition Width="22.5" />
<ColumnDefinition />
</Grid.ColumnDefinitions>
<Grid Grid.Column="1">
<Grid.RowDefinitions>
<RowDefinition Height="Auto" />
<RowDefinition Height="Auto" />
</Grid.RowDefinitions>
<TextBlock Grid.Row="0" LineHeight="15.12" Foreground="#D80073" FontFamily="Wingdings" FontSize="12.6" LineStackingStrategy="BlockLineHeight">
<Run Text="" />
</TextBlock>
</Grid>
<TextBlock Grid.Column="2" LineHeight="19.2" LineStackingStrategy="BlockLineHeight" TextWrapping="Wrap" TextAlignment="Left" Foreground="#FFFFFF" FontFamily="Segoe WP">
<Run Text="The " FontSize="16" /><Run Text="R" FontSize="16" /><Run Text="ibbon is " FontSize="16" /><Run Text="made up of various tabs that provide a fast way of performing tasks. For example, if you need to insert a picture, you click the " FontSize="16" /><Run Text="Insert" FontSize="16" FontWeight="Bold" /><Run Text=" tab and then picture. If you need to create an animation, you click on the " FontSize="16" /><Run Text="Animations" FontSize="16" FontWeight="Bold" /><Run Text=" tab and then, with any object selected, simply select the animation you prefer." FontSize="16" />
</TextBlock>
</Grid>
<Grid Grid.Row="2" Margin="0 0 0 6">
<Grid.ColumnDefinitions>
<ColumnDefinition Width="0" />
<ColumnDefinition Width="22.5" />
<ColumnDefinition />
</Grid.ColumnDefinitions>
<Grid Grid.Column="1">
<Grid.RowDefinitions>
<RowDefinition Height="Auto" />
<RowDefinition Height="Auto" />
</Grid.RowDefinitions>
<TextBlock Grid.Row="0" LineHeight="15.12" Foreground="#D80073" FontFamily="Wingdings" FontSize="12.6" LineStackingStrategy="BlockLineHeight">
<Run Text="" />
</TextBlock>
</Grid>
<TextBlock Grid.Column="2" LineHeight="19.2" LineStackingStrategy="BlockLineHeight" TextWrapping="Wrap" TextAlignment="Left" Foreground="#FFFFFF" FontFamily="Segoe WP">
<Run Text="Some " FontSize="16" /><Run Text="R" FontSize="16" /><Run Text="ibbon " FontSize="16" /><Run Text="bars are contextual – meaning they only appear when you’ve selected the corresponding object. The Drawing (shape), Picture (image) and Table (table) tabs become available and highlighted when you’ve selected those objects." FontSize="16" />
</TextBlock>
</Grid>
<Grid Grid.Row="3" Margin="0 0 0 6">
<Grid.ColumnDefinitions>
<ColumnDefinition Width="0" />
<ColumnDefinition Width="22.5" />
<ColumnDefinition />
</Grid.ColumnDefinitions>
<Grid Grid.Column="1">
<Grid.RowDefinitions>
<RowDefinition Height="Auto" />
<RowDefinition Height="Auto" />
</Grid.RowDefinitions>
<TextBlock Grid.Row="0" LineHeight="15.12" Foreground="#D80073" FontFamily="Wingdings" FontSize="12.6" LineStackingStrategy="BlockLineHeight">
<Run Text="" />
</TextBlock>
</Grid>
<TextBlock Grid.Column="2" LineHeight="19.2" LineStackingStrategy="BlockLineHeight" TextWrapping="Wrap" TextAlignment="Left" Foreground="#FFFFFF" FontFamily="Segoe WP">
<Run Text="Also" FontSize="16" /><Run Text=", when your PowerPoint application is resized, the Ribbon will minimize or display buttons. This means that the command is still available, but it may look and act slightly different" FontSize="16" /><Run Text="." FontSize="16" />
</TextBlock>
</Grid>
</Grid>
</Grid>
</Canvas>
XAML 页面 (UserControl) 和图片的完整副本位于 DropBox。
我找到了两种手动方法来解决此问题:
- 从第一个项目符号文本中删除任意三个字母。这导致 要删除的底部间距。这有点奇怪,因为 第一个项目符号第 2 行中的文本延伸到网格的宽度 在第三个中,没有那么接近,所以没有意义 为什么这会“解决”问题。
- 将
*,它 尺寸又错了。我正在通过自动化进行编码,所以我不会 能够预测有问题的行,除非我确切地知道该行是什么 问题可能是提前设置为*而不是自动。
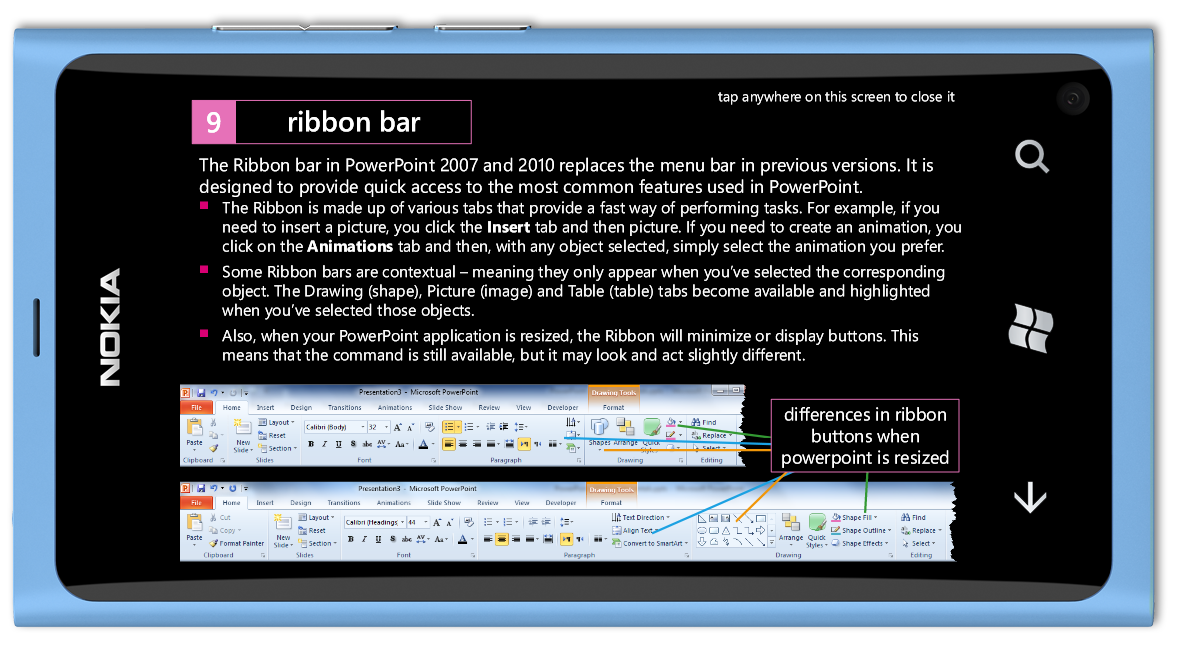
如果布局正确(通过使用上面的#2),它看起来是这样的:
CORRECT LAYOUT

有人吗知道这个“什么都没有的假文本换行”究竟出了什么问题以及如何修复/预测它吗?
I've run into a bit of a strange problem with some XAML layout in Silverlight for Windows Phone 7.5. Basically, I'm creating a number of textboxes in a grid in a canvas, using my own bullet points. The issue is that the first bullet point (see below) has an extended textbox, for no apparent reason. It looks like it is TextWrapping no text. See the spacing below the first bullet point. You'll also notice this cuts off some text on the third bullet:
INCORRECT LAYOUT:

Here's the code for the <Canvas/> object that hosts all of the text and bullet points:
<Canvas Canvas.Left="20.21" Canvas.Top="66" Width="775.96" Height="224.17">
<Grid Canvas.Top="3.6" Canvas.Left="7.2" Width="762.06" Height="216.97">
<Grid VerticalAlignment="Top">
<Grid.RowDefinitions>
<RowDefinition Height="Auto" />
<RowDefinition Height="Auto" />
<RowDefinition Height="Auto" />
<RowDefinition Height="Auto" />
</Grid.RowDefinitions>
<Grid Grid.Row="0">
<TextBlock LineHeight="21.6" LineStackingStrategy="BlockLineHeight" TextWrapping="Wrap" TextAlignment="Left" Foreground="#FFFFFF" FontFamily="Segoe WP" FontSize="18">
<Run Text="The Ribbon bar in PowerPoint 2007 and 2010 replaces the menu bar in previous versions. It is designed to provide quick access to the most common features used in PowerPoint." />
</TextBlock>
</Grid>
<Grid Grid.Row="1" Margin="0 0 0 6">
<Grid.ColumnDefinitions>
<ColumnDefinition Width="0" />
<ColumnDefinition Width="22.5" />
<ColumnDefinition />
</Grid.ColumnDefinitions>
<Grid Grid.Column="1">
<Grid.RowDefinitions>
<RowDefinition Height="Auto" />
<RowDefinition Height="Auto" />
</Grid.RowDefinitions>
<TextBlock Grid.Row="0" LineHeight="15.12" Foreground="#D80073" FontFamily="Wingdings" FontSize="12.6" LineStackingStrategy="BlockLineHeight">
<Run Text="" />
</TextBlock>
</Grid>
<TextBlock Grid.Column="2" LineHeight="19.2" LineStackingStrategy="BlockLineHeight" TextWrapping="Wrap" TextAlignment="Left" Foreground="#FFFFFF" FontFamily="Segoe WP">
<Run Text="The " FontSize="16" /><Run Text="R" FontSize="16" /><Run Text="ibbon is " FontSize="16" /><Run Text="made up of various tabs that provide a fast way of performing tasks. For example, if you need to insert a picture, you click the " FontSize="16" /><Run Text="Insert" FontSize="16" FontWeight="Bold" /><Run Text=" tab and then picture. If you need to create an animation, you click on the " FontSize="16" /><Run Text="Animations" FontSize="16" FontWeight="Bold" /><Run Text=" tab and then, with any object selected, simply select the animation you prefer." FontSize="16" />
</TextBlock>
</Grid>
<Grid Grid.Row="2" Margin="0 0 0 6">
<Grid.ColumnDefinitions>
<ColumnDefinition Width="0" />
<ColumnDefinition Width="22.5" />
<ColumnDefinition />
</Grid.ColumnDefinitions>
<Grid Grid.Column="1">
<Grid.RowDefinitions>
<RowDefinition Height="Auto" />
<RowDefinition Height="Auto" />
</Grid.RowDefinitions>
<TextBlock Grid.Row="0" LineHeight="15.12" Foreground="#D80073" FontFamily="Wingdings" FontSize="12.6" LineStackingStrategy="BlockLineHeight">
<Run Text="" />
</TextBlock>
</Grid>
<TextBlock Grid.Column="2" LineHeight="19.2" LineStackingStrategy="BlockLineHeight" TextWrapping="Wrap" TextAlignment="Left" Foreground="#FFFFFF" FontFamily="Segoe WP">
<Run Text="Some " FontSize="16" /><Run Text="R" FontSize="16" /><Run Text="ibbon " FontSize="16" /><Run Text="bars are contextual – meaning they only appear when you’ve selected the corresponding object. The Drawing (shape), Picture (image) and Table (table) tabs become available and highlighted when you’ve selected those objects." FontSize="16" />
</TextBlock>
</Grid>
<Grid Grid.Row="3" Margin="0 0 0 6">
<Grid.ColumnDefinitions>
<ColumnDefinition Width="0" />
<ColumnDefinition Width="22.5" />
<ColumnDefinition />
</Grid.ColumnDefinitions>
<Grid Grid.Column="1">
<Grid.RowDefinitions>
<RowDefinition Height="Auto" />
<RowDefinition Height="Auto" />
</Grid.RowDefinitions>
<TextBlock Grid.Row="0" LineHeight="15.12" Foreground="#D80073" FontFamily="Wingdings" FontSize="12.6" LineStackingStrategy="BlockLineHeight">
<Run Text="" />
</TextBlock>
</Grid>
<TextBlock Grid.Column="2" LineHeight="19.2" LineStackingStrategy="BlockLineHeight" TextWrapping="Wrap" TextAlignment="Left" Foreground="#FFFFFF" FontFamily="Segoe WP">
<Run Text="Also" FontSize="16" /><Run Text=", when your PowerPoint application is resized, the Ribbon will minimize or display buttons. This means that the command is still available, but it may look and act slightly different" FontSize="16" /><Run Text="." FontSize="16" />
</TextBlock>
</Grid>
</Grid>
</Grid>
</Canvas>
A full copy of the XAML page (UserControl) and pictures is on DropBox.
I've found two manual ways to fix this:
- From the first bullet text, remove any three letters. This causes
the bottom spacing to be removed. This is a bit weird though as the
text in line #2 of the first bullet extends to the width of the grid
and in the 3rd one doesn't come as close, so it doesn't make sense
why this would "fix" the issue. - Put a
<RowDefinition Height="*" />on the second row in the
first grid instead of<RowDefinition Height="Auto" />. This is
unpredictable though - if I set it to*for other rowes, it
mis-sizes again. I'm doing this coding from automation, so I won't
be able to predict a problematic row unless I know exactly what the
problem may be in advance in order to set it as*instead ofAuto.
This is what it looks like if it is laid out correctly (by using #2 above):
CORRECT LAYOUT

Does anyone know what exactly is wrong here with this "fake text wrapping of nothing" and how to fix / predict it?
如果你对这篇内容有疑问,欢迎到本站社区发帖提问 参与讨论,获取更多帮助,或者扫码二维码加入 Web 技术交流群。

绑定邮箱获取回复消息
由于您还没有绑定你的真实邮箱,如果其他用户或者作者回复了您的评论,将不能在第一时间通知您!

发布评论
评论(2)
我不知道为什么你需要这个
Canvas来包裹Grid。我下载了您的文件并删除了这个
Canvas,还将内部Grid的属性更改为如下所示,您可以看到我删除了
Height> 这解决了你的第二个问题。最初,Grid的长度不足以显示所有文本。我所做的另一个更改是将
Width替换为MaxWidth,这样Width现在可以自动调整大小,如果您重新编译项目,您将看到这个词prefer.现在转到第二行并完美填补空白。我认为真正的问题是,一旦你给
TextBlock一个固定的Width,它首先认为单词prefer.需要转到下一行,但是因为Width是一个固定值,所以它仍然会在行尾挤压它。为了避免这种情况,您可能希望使Width自动调整大小。我可能是错的,但希望这能有所帮助。 :)
I am not sure why you need this
Canvasto wrap theGrid.I downloaded your file and removed this
Canvas, also changed the innerGrid's attributes to be something like this,You can see I removed the
Heightand this fixed your second issue. Initilally theGridwasn't long enough to display all the text.Another change I made was replaced
WidthwithMaxWidth, this way theWidthis now auto sized, if you recomplie your project you will see the wordprefer.now goes to the second line and fills the gap perfectly.I think the real problem is once you give
TextBlocka fixedWidth, first it thinks the wordprefer.needs to go to the next line but because theWidthis a fixed value it somehow still squeezes it at the end of the line. To avoid this, you probably want to make theWidthauto-sized.I might be wrong but hope this could be any of help. :)
不知何故,所有这些固定值的组合会导致包装变得奇怪。我有一个建议可以解决包装问题,同时保留大部分值。
DockPanel(在此处进行了描述和下载)这项工作做得很好。我为项目符号和文本的每种组合使用一个
DockPanel来替换之前使用的两个Grid:此面板也可能非常适合布局的其他部分。
Somehow the combination of all these fixed values causes the wrapping to be strange. I have a suggestion which solves the wrapping issue while conserving most of these values. The
DockPanel(described and downloadable here) does the job quite well.I use one
DockPanelfor each combination of bullet point and text replacing the twoGrids used before:This panel might also be well suited for other parts of your layout.