动态视图框不拉伸
在我的早期输入示例中盒子,我有一个窗口变量。我创建了一些控件(文本框、标签、按钮)。这些控件的父级是画布。 canvas 的父级是 ViewBox (因为 ViewBox 只能包含一个子级),而 ViewBox 的父级是窗口。 所以层次结构就像Window->Viewbox->Canvas->控件。所有这些控件的创建和父子关系都是动态完成的。
        winInputDialog = new Window();
        lblPrompt = new Label();
        btnOK = new Button();
        btnCancel = new Button();
        txtInput = new TextBox();
        cvContainer = new Canvas();
        VB = new Viewbox();

        //
        // lblPrompt
        //
        lblPrompt.Background = new SolidColorBrush(SystemColors.ControlColor);
        lblPrompt.FontFamily = new FontFamily("Microsoft Sans Serif");
        lblPrompt.FontSize = 12;
        lblPrompt.Background = new SolidColorBrush(Colors.Transparent);
        lblPrompt.FontStyle = FontStyles.Normal;
        lblPrompt.Margin = new Thickness(8, 9, 0, 0);
        lblPrompt.Name = "lblPrompt";
        lblPrompt.Width = 302;
        lblPrompt.Height = 82;
        lblPrompt.TabIndex = 3;
        //
        // btnOK
        //
        btnOK.Margin = new Thickness(322, 8, 0, 0);
        btnOK.Name = "btnOK";
        btnOK.Width = 64;
        btnOK.Height = 24;
        btnOK.TabIndex = 1;
        btnOK.Content = "OK";
        btnOK.Click += new RoutedEventHandler(btnOK_Click);
        //
        // btnCancel
        //
        btnCancel.Margin = new Thickness(322, 40, 0, 0);
        btnCancel.Name = "btnCancel";
        btnCancel.Width = 64;
        btnCancel.Height = 24;
        btnCancel.TabIndex = 2;
        btnCancel.Content = "Cancel";
        btnCancel.Click += new RoutedEventHandler(btnCancel_Click);
        //
        // txtInput
        //
        txtInput.Margin = new Thickness(8, 70, 0, 0);
        txtInput.Name = "txtInput";
        txtInput.Width = 379;
        txtInput.Height = 25;
        txtInput.TabIndex = 0;
        //
        //Canvas
        //

        double width = System.Windows.SystemParameters.PrimaryScreenWidth / 3, height = System.Windows.SystemParameters.PrimaryScreenHeight / 4;

        cvContainer.Height = height;
        cvContainer.Width = width;

        cvContainer.Children.Add(txtInput);
        cvContainer.Children.Add(btnCancel);
        cvContainer.Children.Add(btnOK);
        cvContainer.Children.Add(lblPrompt);
        cvContainer.ClipToBounds = true;
        //
        //ViewBox
        //
        VB.Stretch = Stretch.Fill;
        VB.Child = cvContainer;
        //
        // InputBoxDialog
        //
        winInputDialog.Width = width;
        winInputDialog.Height = height;
        winInputDialog.Content = VB;
        winInputDialog.Icon = new System.Windows.Media.Imaging.BitmapImage(new System.Uri(System.IO.Directory.GetCurrentDirectory() + @"\drop-box-icon.png"));
        winInputDialog.WindowStartupLocation = WindowStartupLocation.CenterScreen;
        //winInputDialog.WindowStyle = WindowStyle.SingleBorderWindow;
        winInputDialog.ResizeMode = ResizeMode.CanResizeWithGrip;
        winInputDialog.Name = "InputBoxDialog";
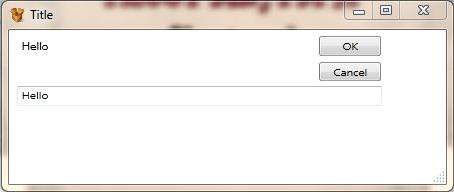
我已将画布的宽度和高度属性设置为等于窗口。但为什么我的屏幕看起来像这样:

为什么控件和窗口边框之间有空间,即使它们位于视图框中。我什至尝试过 Cliptobounds 但还是一样。
如果我设置 Viewbox 的高度和宽度,它不会拉伸并且行为与 Viewbox 不同。
我想动态设置这个屏幕。如何?
示例项目位于http://122.160.24.172/download/customer_data/InputBox_New.rar。
In my earlier example of Input Box, I have a window variable. I created some controls(Textbox, Label, Buttons). Parent of these controls is canvas. Parent of canvas is a ViewBox (because ViewBox can only contain one child) and parent of ViewBox is the window.
So hierarchy is like Window->Viewbox->Canvas-> Controls. All these control creation and parenting is done dynamically.
        winInputDialog = new Window();
        lblPrompt = new Label();
        btnOK = new Button();
        btnCancel = new Button();
        txtInput = new TextBox();
        cvContainer = new Canvas();
        VB = new Viewbox();

        //
        // lblPrompt
        //
        lblPrompt.Background = new SolidColorBrush(SystemColors.ControlColor);
        lblPrompt.FontFamily = new FontFamily("Microsoft Sans Serif");
        lblPrompt.FontSize = 12;
        lblPrompt.Background = new SolidColorBrush(Colors.Transparent);
        lblPrompt.FontStyle = FontStyles.Normal;
        lblPrompt.Margin = new Thickness(8, 9, 0, 0);
        lblPrompt.Name = "lblPrompt";
        lblPrompt.Width = 302;
        lblPrompt.Height = 82;
        lblPrompt.TabIndex = 3;
        //
        // btnOK
        //
        btnOK.Margin = new Thickness(322, 8, 0, 0);
        btnOK.Name = "btnOK";
        btnOK.Width = 64;
        btnOK.Height = 24;
        btnOK.TabIndex = 1;
        btnOK.Content = "OK";
        btnOK.Click += new RoutedEventHandler(btnOK_Click);
        //
        // btnCancel
        //
        btnCancel.Margin = new Thickness(322, 40, 0, 0);
        btnCancel.Name = "btnCancel";
        btnCancel.Width = 64;
        btnCancel.Height = 24;
        btnCancel.TabIndex = 2;
        btnCancel.Content = "Cancel";
        btnCancel.Click += new RoutedEventHandler(btnCancel_Click);
        //
        // txtInput
        //
        txtInput.Margin = new Thickness(8, 70, 0, 0);
        txtInput.Name = "txtInput";
        txtInput.Width = 379;
        txtInput.Height = 25;
        txtInput.TabIndex = 0;
        //
        //Canvas
        //

        double width = System.Windows.SystemParameters.PrimaryScreenWidth / 3, height = System.Windows.SystemParameters.PrimaryScreenHeight / 4;

        cvContainer.Height = height;
        cvContainer.Width = width;

        cvContainer.Children.Add(txtInput);
        cvContainer.Children.Add(btnCancel);
        cvContainer.Children.Add(btnOK);
        cvContainer.Children.Add(lblPrompt);
        cvContainer.ClipToBounds = true;
        //
        //ViewBox
        //
        VB.Stretch = Stretch.Fill;
        VB.Child = cvContainer;
        //
        // InputBoxDialog
        //
        winInputDialog.Width = width;
        winInputDialog.Height = height;
        winInputDialog.Content = VB;
        winInputDialog.Icon = new System.Windows.Media.Imaging.BitmapImage(new System.Uri(System.IO.Directory.GetCurrentDirectory() + @"\drop-box-icon.png"));
        winInputDialog.WindowStartupLocation = WindowStartupLocation.CenterScreen;
        //winInputDialog.WindowStyle = WindowStyle.SingleBorderWindow;
        winInputDialog.ResizeMode = ResizeMode.CanResizeWithGrip;
        winInputDialog.Name = "InputBoxDialog";
I have set the width and height property of canvas equal to window. But why my screen look like this:

Why is there space between controls and window borders even though they are in viewbox. I even tried Cliptobounds but still the same.
If i set Viewbox height and width it does not stretch and behave unlike a Viewbox.
i want to set this screen dynamically. How?
Sample Project is at http://122.160.24.172/download/customer_data/InputBox_New.rar.
如果你对这篇内容有疑问,欢迎到本站社区发帖提问 参与讨论,获取更多帮助,或者扫码二维码加入 Web 技术交流群。

绑定邮箱获取回复消息
由于您还没有绑定你的真实邮箱,如果其他用户或者作者回复了您的评论,将不能在第一时间通知您!

发布评论
评论(1)
如果您希望窗口具有动态布局,为什么不使用与静态的
Canvas不同的动态容器呢?您可以使用像这样的
Grid-这样您的窗口将在其大小更改时自行布局。
如果您愿意,您仍然可以调整按钮大小和边距。
除非您确实需要支持精确的像素协调定位布局,否则不要使用
Canvas。另外:为什么要以编程方式布局窗口而不是 XAML?
If you want your window to have a dynamic layout, why won't you use a dynamic container unlike
Canvaswhich is static?You could use a
Gridlike this -This way your window will layout itself when its size is changed.
You can still adjust the button size and margin if you'd like.
Don't use a
Canvasunless you really need support for exact pixel coordination positioning layout.Also: Why are you layouting your window programatically and not in XAML?