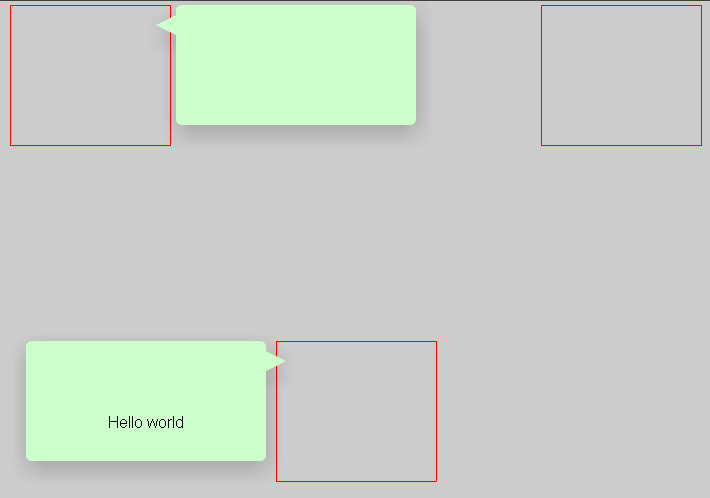
根据其内容调整spark.components.Label的大小并找到其尺寸
我正在将 Flash 游戏移植到 Flex。
在最初的 Flash 游戏中,当玩家聊天时,我将该文本分配给 TextField(其具有编码宽度 W=240 和 wordWrap=true、 >multiline=true)。之后,我使用 TextField 的 textHeight 在其周围(及其下方)绘制一个矩形:
    public function set text(str:String):void {
        _tf.text = str;
        _tf.height = _tf.textHeight + 2 * PAD;

        // draw the rectangle around the TextField
        _rect.x = _tf.x - PAD;
        _rect.y = _tf.y - PAD;
        _rect.graphics.clear();
        _rect.graphics.beginFill(BGCOLOR, 0.8);
        _rect.graphics.drawRoundRect(0, 0, _tf.textWidth + 2 * PAD, _tf.textHeight + 2 * PAD, R);
        _rect.graphics.endFill();

        _fadeTimer.reset();
        _fadeTimer.start();
    }
但在我的新 Flex 应用程序中,我不知道如何找到 标签尺寸以及如何使其随文本一起增长。
这是我的测试用例,它没有按预期工作(但它可以在 Flash Builder 中运行)。
大家有什么建议吗,我查了很多。

BubbleTest.mxml:
<?xml version="1.0" encoding="utf-8"?>
<s:Application
    xmlns:fx="http://ns.adobe.com/mxml/2009"
    xmlns:s="library://ns.adobe.com/flex/spark"
    xmlns:mx="library://ns.adobe.com/flex/mx"
    xmlns:comps="*"
    width="700" height="525" backgroundColor="#CCCCCC"
    creationComplete="init()">

    <fx:Script>
        <![CDATA[
            public function init():void {
                _bubble0.text = 'Hello world';
            }
        ]]>
    </fx:Script>

    <s:Rect id="_user0" horizontalCenter="0" y="340" width="160" height="140">
        <s:stroke>
            <s:SolidColorStroke color="red" />
        </s:stroke>
    </s:Rect>

    <s:Rect id="_user1" left="4" top="4" width="160" height="140">
        <s:stroke>
            <s:SolidColorStroke color="red" />
        </s:stroke>
    </s:Rect>

    <s:Rect id="_user2" right="4" top="4" width="160" height="140">
        <s:stroke>
            <s:SolidColorStroke color="red" />
        </s:stroke>
    </s:Rect>

    <comps:Bubble id="_bubble0" x="20" y="340" />
    <comps:Bubble id="_bubble1" left="170" top="4" />
    <comps:Bubble id="_bubble2" right="170" top="4" />

</s:Application>
Bubble.mxml:
<?xml version="1.0" encoding="utf-8"?>
<s:Group
    xmlns:fx="http://ns.adobe.com/mxml/2009"
    xmlns:s="library://ns.adobe.com/flex/spark"
    xmlns:mx="library://ns.adobe.com/flex/mx"
    creationComplete="init(event)">

    <fx:Script>
        <![CDATA[
            import mx.events.FlexEvent;

            public static const W:uint = 240;
            private static const R:uint = 6;
            private static const PAD:uint = 4;
            private static const BGCOLOR:uint = 0xCCFFCC;

            private var _timer:Timer = new Timer(500, 20);

            public function init(event:FlexEvent):void {
                _timer.addEventListener(TimerEvent.TIMER, fadeBubble);
                _timer.addEventListener(TimerEvent.TIMER_COMPLETE, hideBubble);
                addEventListener(MouseEvent.CLICK, hideBubble);

                if (x > 100 && x < 200) {
                    _left.visible = true;
                    _right.visible = false;
                } else {
                    _left.visible = false;
                    _right.visible = true;
                }
            }

            public function set text(str:String):void {
                _text.setStyle('color', Util.isRed(str) ? 0xFF0000 : 0x000000);
                _text.text = str;

                // XXX resize _rect here, but how?

                _timer.reset();
                _timer.start();
            }


            public function get text():String {
                return _text.text;
            }

            private function fadeBubble(event:TimerEvent):void {
                if (_timer.currentCount * 2 > _timer.repeatCount)
                    alpha /= 2;
            }

            public function hideBubble(event:MouseEvent):void {
                visible = false;
                _timer.stop();
            }
        ]]>
    </fx:Script>

    <s:Graphic id="_right" x="{W}" y="0">
        <s:Path data="L 0 10
                L 20 20
                L 0 30">
            <s:fill>
                <s:SolidColor color="{BGCOLOR}" />
            </s:fill>
        </s:Path>
    </s:Graphic>

    <s:Graphic id="_left" x="0" y="0">
        <s:Path data="L 0 10
                L -20 20
                L 0 30">
            <s:fill>
                <s:SolidColor color="{BGCOLOR}" />
            </s:fill>
        </s:Path>
    </s:Graphic>

    <s:Rect id="_rect" x="0" y="0" width="{W}" height="120" radiusX="{R}" radiusY="{R}">
        <s:fill>
            <s:SolidColor color="{BGCOLOR}" />
        </s:fill>
    </s:Rect>

    <s:Label id="_text" x="0" y="75" width="{W}" fontSize="16" textAlign="center" />
</s:Group>
到目前为止,我只有 2 个想法:
1)以某种方式获取 Label 的 mx_internal TextField
import mx.core.mx_internal;
use namespace mx_internal;
// XXX and then?
2)使用
但也许还有更轻松的方法?
如果你对这篇内容有疑问,欢迎到本站社区发帖提问 参与讨论,获取更多帮助,或者扫码二维码加入 Web 技术交流群。

绑定邮箱获取回复消息
由于您还没有绑定你的真实邮箱,如果其他用户或者作者回复了您的评论,将不能在第一时间通知您!

发布评论
评论(1)
如果您使用 Flex,您将不得不稍微改变一下您对布局的思考方式。您想要做的是将矩形设置为基于百分比的宽度,并设置绝对宽度。这允许布局执行所谓的“大小到内容”,意思是,其宽度将由其子级决定。然后,使用基于百分比的宽度的项目将查看该值并自行布局。有点难以用文字解释,所以我将新的 Bubble.mxml 粘贴在这里供您查看。它可能不是您想要的确切外观,但这应该可以帮助您入门,并且只需要进行一些调整即可获得您想要的确切外观。
You will have to change the way you think about layouts a bit if you use flex. What you want to do is set the rectangles to be percentage based width and set the absolute width on nothing. What this allows the layout to do is what is called "Size to Content" meaning, its width will be determined by its children. Then the items that use percentage based width will look at that value and lay themselves out. A bit hard to explain through words so I pasted the new Bubble.mxml here for you to take a look. It probably isn't the exact look you want but this should get you started and will only take a little tweaking to get it exactly how you want.