如何在 UIView 中加载 xib 文件

发布于 2024-12-10 09:53:00 字数 330 浏览 0 评论 0原文

我一直在到处寻找,但到目前为止没有任何对我有用的东西。

基本上我想要一个名为 rootView.xib 的 .xib 文件,在其中我想要一个 UIView (让我们称之为 containerView ),它只占据屏幕的一半(所以会有常规视图和新视图)。然后我想要一个名为firstView.xib 的不同.xib 文件并将其加载到containerView 内。所以我可以在firstView.xib上有一堆东西,在rootView.xib上有一堆不同的东西,然后将我的firstView.xib加载到rootView.xib的containerView中,但由于它只占据屏幕的一半,你仍然会看到rootView.xib 上的内容

I have been searching everywhere and nothing so far has worked for me.

Basically I want to have a .xib file called rootView.xib and inside it I want to have a UIView (lets call it containerView) that takes up only half of the screen (so there would be the regular view and a new view). Then I want a different .xib file called firstView.xib and load it inside of containerView. So I can have a bunch of stuff on firstView.xib and a bunch of different stuff in rootView.xib and load my firstView.xib inside of containerView in rootView.xib but since it only takes up half of the screen you would still see the stuff on rootView.xib

如果你对这篇内容有疑问,欢迎到本站社区发帖提问 参与讨论,获取更多帮助,或者扫码二维码加入 Web 技术交流群。

扫码二维码加入Web技术交流群

发布评论

需要 登录 才能够评论, 你可以免费 注册 一个本站的账号。

评论(7

总以为 2024-12-17 09:53:00

要以编程方式从 xib 文件中获取对象,您可以使用: [[NSBundle mainBundle] loadNibNamed:@"MyXibName"owner:self options:nil] 它返回 xib 中顶级对象的数组。

所以,你可以做这样的事情:

UIView *rootView = [[[NSBundle mainBundle] loadNibNamed:@"MyRootView" owner:self options:nil] objectAtIndex:0];
UIView *containerView = [[[NSBundle mainBundle] loadNibNamed:@"MyContainerView" owner:self options:nil] lastObject];
[rootView addSubview:containerView];
[self.view addSubview:rootView];

To get an object from a xib file programatically you can use: [[NSBundle mainBundle] loadNibNamed:@"MyXibName" owner:self options:nil] which returns an array of the top level objects in the xib.

So, you could do something like this:

UIView *rootView = [[[NSBundle mainBundle] loadNibNamed:@"MyRootView" owner:self options:nil] objectAtIndex:0];
UIView *containerView = [[[NSBundle mainBundle] loadNibNamed:@"MyContainerView" owner:self options:nil] lastObject];
[rootView addSubview:containerView];
[self.view addSubview:rootView];
顾挽 2024-12-17 09:53:00

我在 github 上创建了一个示例项目,用于从另一个 .xib 文件内的 .xib 文件加载 UIView。或者您可以通过编程来完成。

这对于您想要在不同 UIViewController 对象上重用的小部件很有用。

  1. 新方法:https://github.com/PaulSolt/CustomUIView
  2. 原始方法:https://github.com/PaulSolt/CompositeXib

从 .xib 文件加载自定义 UIView

I created a sample project on github to load a UIView from a .xib file inside another .xib file. Or you can do it programmatically.

This is good for little widgets you want to reuse on different UIViewController objects.

  1. New Approach: https://github.com/PaulSolt/CustomUIView
  2. Original Approach: https://github.com/PaulSolt/CompositeXib

Load a Custom UIView from .xib file

撕心裂肺的伤痛 2024-12-17 09:53:00

[Swift 实现]

从 xib 加载视图的通用方法:

示例:

let myView = Bundle.loadView(fromNib: "MyView", withType: MyView.self)

实现:

extension Bundle {

    static func loadView<T>(fromNib name: String, withType type: T.Type) -> T {
        if let view = Bundle.main.loadNibNamed(name, owner: nil, options: nil)?.first as? T {
            return view
        }

        fatalError("Could not load view with type " + String(describing: type))
    }
}

[Swift Implementation]

Universal way of loading view from xib:

Example:

let myView = Bundle.loadView(fromNib: "MyView", withType: MyView.self)

Implementation:

extension Bundle {

    static func loadView<T>(fromNib name: String, withType type: T.Type) -> T {
        if let view = Bundle.main.loadNibNamed(name, owner: nil, options: nil)?.first as? T {
            return view
        }

        fatalError("Could not load view with type " + String(describing: type))
    }
}
半暖夏伤 2024-12-17 09:53:00

你可以尝试:

UIView *firstViewUIView = [[[NSBundle mainBundle] loadNibNamed:@"firstView" owner:self options:nil] firstObject];
[self.view.containerView addSubview:firstViewUIView];

You could try:

UIView *firstViewUIView = [[[NSBundle mainBundle] loadNibNamed:@"firstView" owner:self options:nil] firstObject];
[self.view.containerView addSubview:firstViewUIView];
难得心□动 2024-12-17 09:53:00

创建 XIB 文件:

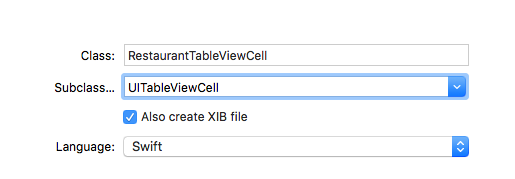
文件->新建文件->ios->cocoa touch class->下一页

输入图片此处描述

确保选中“同时创建 XIB 文件”

我想使用 tableview 执行,因此我选择了子类 UITableViewCell

您可以选择作为您的要求

<一href="https://i.sstatic.net/xa59u.png" rel="noreferrer">在此处输入图像描述
根据您的意愿设计 XIB 文件 (RestaurantTableViewCell.xib)

在此处输入图像描述

我们需要获取行高来设置表格每行的高度

在此处输入图像描述

现在!需要快速归档它们。我把restaurantPhotorestaurantName给你了,你们可以把你们所有人都给我。

输入图像描述这里

现在添加一个 UITableView

在此处输入图像描述

名称
nib 文件的名称,不需要包含 .nib 扩展名。

所有者
指定为 nib 的文件所有者对象的对象。

选项
包含打开 nib 文件时使用的选项的字典。

第一
如果您不先定义,则获取所有视图..因此您需要获取该集合中的一个视图 frist

Bundle.main.loadNibNamed("yourUIView", owner: self, options: nil)?.first as! yourUIView

这是表视图控制器

import UIKit

class RestaurantTableViewController: UIViewController ,UITableViewDataSource,UITableViewDelegate{

    override func viewDidLoad() {
        super.viewDidLoad()

        // Do any additional setup after loading the view.
    }

    override func didReceiveMemoryWarning() {
        super.didReceiveMemoryWarning()
        // Dispose of any resources that can be recreated.
    }
    func numberOfSections(in tableView: UITableView) -> Int {
        return 1
    }

    func tableView(_ tableView: UITableView, numberOfRowsInSection section: Int) -> Int {
        return 5
    }
    func tableView(_ tableView: UITableView, cellForRowAt indexPath: IndexPath) -> UITableViewCell {
        let restaurantTableviewCell = Bundle.main.loadNibNamed("RestaurantTableViewCell", owner: self, options: nil)?.first as! RestaurantTableViewCell

        restaurantTableviewCell.restaurantPhoto.image = UIImage(named: "image1")
        restaurantTableviewCell.restaurantName.text = "KFC Chicken"

        return restaurantTableviewCell
    }
   // set row height
    func tableView(_ tableView: UITableView, heightForRowAt indexPath: IndexPath) -> CGFloat {
        return 150
    }

}

完成的完整代码:)

在此处输入图像描述

Create a XIB file :

File -> new File ->ios->cocoa touch class -> next

enter image description here

make sure check mark "also create XIB file"

I would like to perform with tableview so I choosed subclass UITableViewCell

you can choose as your requerment

enter image description here

XIB file desing as your wish (RestaurantTableViewCell.xib)

enter image description here

we need to grab the row height to set table each row hegiht

enter image description here

Now! need to huck them swift file . i am hucked the restaurantPhoto and restaurantName you can huck all of you .

enter image description here

Now adding a UITableView

enter image description here

name
The name of the nib file, which need not include the .nib extension.

owner
The object to assign as the nib’s File's Owner object.

options
A dictionary containing the options to use when opening the nib file.

first
if you do not define first then grabing all view .. so you need to grab one view inside that set frist .

Bundle.main.loadNibNamed("yourUIView", owner: self, options: nil)?.first as! yourUIView

here is table view controller Full code

import UIKit

class RestaurantTableViewController: UIViewController ,UITableViewDataSource,UITableViewDelegate{

    override func viewDidLoad() {
        super.viewDidLoad()

        // Do any additional setup after loading the view.
    }

    override func didReceiveMemoryWarning() {
        super.didReceiveMemoryWarning()
        // Dispose of any resources that can be recreated.
    }
    func numberOfSections(in tableView: UITableView) -> Int {
        return 1
    }

    func tableView(_ tableView: UITableView, numberOfRowsInSection section: Int) -> Int {
        return 5
    }
    func tableView(_ tableView: UITableView, cellForRowAt indexPath: IndexPath) -> UITableViewCell {
        let restaurantTableviewCell = Bundle.main.loadNibNamed("RestaurantTableViewCell", owner: self, options: nil)?.first as! RestaurantTableViewCell

        restaurantTableviewCell.restaurantPhoto.image = UIImage(named: "image1")
        restaurantTableviewCell.restaurantName.text = "KFC Chicken"

        return restaurantTableviewCell
    }
   // set row height
    func tableView(_ tableView: UITableView, heightForRowAt indexPath: IndexPath) -> CGFloat {
        return 150
    }

}

you done :)

enter image description here

林空鹿饮溪 2024-12-17 09:53:00

对于 Swift 4.2

假设您有一个名为 NibView 的类,关联的 nib 文件是 NibView.xib

class NibView: UIView {

    class func getScreen() -> NibView {
        let xib = Bundle.main.loadNibNamed(String(describing :self), owner: self, options: nil)
        let me = xib![0] as! NibView
        return me
    }

}

创建该类的实例并添加到您的查看您想要的特定布局

let myView = NibView.getScreen()
self.yourView.addSubview(myView)

For Swift 4.2

Let's assume you have a class named NibView and associated nib file is NibView.xib

class NibView: UIView {

    class func getScreen() -> NibView {
        let xib = Bundle.main.loadNibNamed(String(describing :self), owner: self, options: nil)
        let me = xib![0] as! NibView
        return me
    }

}

create an instance of the class and add in your view with your specific layout whatever you want

let myView = NibView.getScreen()
self.yourView.addSubview(myView)
梦在夏天 2024-12-17 09:53:00

对于 swift 3 和4

let customView = Bundle.main.loadNibNamed("CustomView", owner: nil, options: nil)?.first as? CustomView

For swift 3 & 4

let customView = Bundle.main.loadNibNamed("CustomView", owner: nil, options: nil)?.first as? CustomView
~没有更多了~
我们使用 Cookies 和其他技术来定制您的体验包括您的登录状态等。通过阅读我们的 隐私政策 了解更多相关信息。 单击 接受 或继续使用网站,即表示您同意使用 Cookies 和您的相关数据。
原文