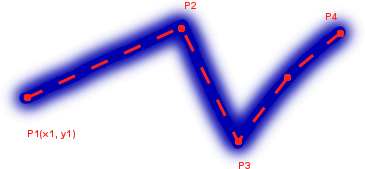
如何画“发光的” OpenGL ES 中的线

能否请您分享一些关于如何绘制纹理线(平滑或具有纹理线)的代码(任何语言)发光效果,蓝线,四个点)由许多点组成,就像使用 OpenGL ES 1.0 的附加图像一样。
我正在尝试使用纹理 16x16 或 1x16 像素对 GL_LINE_STRIP 进行纹理化,但没有成功。

Could you please share some code (any language) on how draw textured line (that would be smooth or have a glowing like effect, blue line, four points) consisting of many points like on attached image using OpenGL ES 1.0.
What I was trying was texturing a GL_LINE_STRIP with texture 16x16 or 1x16 pixels, but without any success.
如果你对这篇内容有疑问,欢迎到本站社区发帖提问 参与讨论,获取更多帮助,或者扫码二维码加入 Web 技术交流群。

绑定邮箱获取回复消息
由于您还没有绑定你的真实邮箱,如果其他用户或者作者回复了您的评论,将不能在第一时间通知您!

发布评论
评论(1)
在 ES 1.0 中,您可以创造性地使用渲染到纹理来实现您想要的效果,但在填充率方面可能会付出高昂的代价。 Gamasutra 有一篇(旧)文章介绍了 Tron 中如何实现发光2.0 游戏 — 您需要特别注意 DirectX 7.0 注释,因为它与 ES 1.0 一样是固定管道。在您的情况下,您可能只想显示高斯图像,而不是将其与原始图像混合,因为您只对发光感兴趣。
我对本文的总结是:
这些不透明度数字源自此页面上的 2d 高斯内核。尝试使用它们来影响向线外侧的下降。
请注意此处涉及的额外成本:表面上您添加了十个全屏纹理绘制以及一些帧缓冲区交换。通过使用多重纹理,您可能可以减少绘制次数。着色器方法可能会在一次传递中完成水平和垂直步骤。
In ES 1.0 you can use render-to-texture creatively to achieve the effect that you want, but it's likely to be costly in terms of fill rate. Gamasutra has an (old) article on how glow was achieved in the Tron 2.0 game — you'll want to pay particular attention to the DirectX 7.0 comments since that was, like ES 1.0, a fixed pipeline. In your case you probably want just to display the Gaussian image rather than mixing it with an original since the glow is all you're interested in.
My summary of the article is:
Those opacity numbers were derived from the 2d Gaussian kernel on this page. Play around with them to affect the fall off towards the outside of your lines.
Note the extra costs involved here: you're ostensibly adding ten full-screen textured draws plus some framebuffer swapping. You can probably get away with fewer draws by using multitexturing. A shader approach would likely do the horizontal and vertical steps in a single pass.