如何向 WPF 文本框添加提示文本?

发布于 2024-12-04 13:12:40 字数 145 浏览 2 评论 0 原文

例如,当文本框为空时,Facebook 的搜索文本框中会显示“搜索”提示文本。

如何用WPF文本框实现这一点?

Facebook 的搜索文本框

For example, Facebook has a "Search" hint text in the Search text box when the textbox is empty.

How to achieve this with WPF text boxes??

Facebook's search textbox

如果你对这篇内容有疑问,欢迎到本站社区发帖提问 参与讨论,获取更多帮助,或者扫码二维码加入 Web 技术交流群。

扫码二维码加入Web技术交流群

发布评论

需要 登录 才能够评论, 你可以免费 注册 一个本站的账号。

评论(15

短暂陪伴 2024-12-11 13:12:40

您可以使用 VisualBrushStyle 中的一些触发器更轻松地完成此操作:

<TextBox>
    <TextBox.Style>
        <Style TargetType="TextBox" xmlns:sys="clr-namespace:System;assembly=mscorlib">
            <Style.Resources>
                <VisualBrush x:Key="CueBannerBrush" AlignmentX="Left" AlignmentY="Center" Stretch="None">
                    <VisualBrush.Visual>
                        <Label Content="Search" Foreground="LightGray" />
                    </VisualBrush.Visual>
                </VisualBrush>
            </Style.Resources>
            <Style.Triggers>
                <Trigger Property="Text" Value="{x:Static sys:String.Empty}">
                    <Setter Property="Background" Value="{StaticResource CueBannerBrush}" />
                </Trigger>
                <Trigger Property="Text" Value="{x:Null}">
                    <Setter Property="Background" Value="{StaticResource CueBannerBrush}" />
                </Trigger>
                <Trigger Property="IsKeyboardFocused" Value="True">
                    <Setter Property="Background" Value="White" />
                </Trigger>
            </Style.Triggers>
        </Style>
    </TextBox.Style>
</TextBox>

要提高此 Style 的可重用性,您可以还创建一组附加属性来控制实际的提示横幅文本、颜色、方向等。

You can accomplish this much more easily with a VisualBrush and some triggers in a Style:

<TextBox>
    <TextBox.Style>
        <Style TargetType="TextBox" xmlns:sys="clr-namespace:System;assembly=mscorlib">
            <Style.Resources>
                <VisualBrush x:Key="CueBannerBrush" AlignmentX="Left" AlignmentY="Center" Stretch="None">
                    <VisualBrush.Visual>
                        <Label Content="Search" Foreground="LightGray" />
                    </VisualBrush.Visual>
                </VisualBrush>
            </Style.Resources>
            <Style.Triggers>
                <Trigger Property="Text" Value="{x:Static sys:String.Empty}">
                    <Setter Property="Background" Value="{StaticResource CueBannerBrush}" />
                </Trigger>
                <Trigger Property="Text" Value="{x:Null}">
                    <Setter Property="Background" Value="{StaticResource CueBannerBrush}" />
                </Trigger>
                <Trigger Property="IsKeyboardFocused" Value="True">
                    <Setter Property="Background" Value="White" />
                </Trigger>
            </Style.Triggers>
        </Style>
    </TextBox.Style>
</TextBox>

To increase the re-usability of this Style, you can also create a set of attached properties to control the actual cue banner text, color, orientation etc.

茶色山野 2024-12-11 13:12:40

这是我的简单解决方案,改编自 Microsoft (https://code.msdn.microsoft.com/windowsapps/How-to-add-a-hint-text-to-ed66a3c6

    <Grid Background="White" HorizontalAlignment="Right" VerticalAlignment="Top"  >
        <!-- overlay with hint text -->
        <TextBlock Margin="5,2" MinWidth="50" Text="Suche..." 
                   Foreground="LightSteelBlue" Visibility="{Binding ElementName=txtSearchBox, Path=Text.IsEmpty, Converter={StaticResource MyBoolToVisibilityConverter}}" IsHitTestVisible="False"/>
        <!-- enter term here -->
        <TextBox MinWidth="50" Name="txtSearchBox" Background="Transparent" />
    </Grid>

This is my simple solution, adapted from Microsoft (https://code.msdn.microsoft.com/windowsapps/How-to-add-a-hint-text-to-ed66a3c6)

    <Grid Background="White" HorizontalAlignment="Right" VerticalAlignment="Top"  >
        <!-- overlay with hint text -->
        <TextBlock Margin="5,2" MinWidth="50" Text="Suche..." 
                   Foreground="LightSteelBlue" Visibility="{Binding ElementName=txtSearchBox, Path=Text.IsEmpty, Converter={StaticResource MyBoolToVisibilityConverter}}" IsHitTestVisible="False"/>
        <!-- enter term here -->
        <TextBox MinWidth="50" Name="txtSearchBox" Background="Transparent" />
    </Grid>
半步萧音过轻尘 2024-12-11 13:12:40

使用 materialDesign HintAssist 怎么样?我正在使用这个,你也可以添加浮动提示:

<TextBox Width="150" Height="40" Text="hello" materialDesign:HintAssist.Hint="address"  materialDesign:HintAssist.IsFloating="True"></TextBox>

我使用 Nuget 包安装了 Material Design,文档链接

what about using materialDesign HintAssist ? i'm using this which also you can add floating hint too :

<TextBox Width="150" Height="40" Text="hello" materialDesign:HintAssist.Hint="address"  materialDesign:HintAssist.IsFloating="True"></TextBox>

i installed Material Design with Nuget Package there is installation guide in documentation link

耳钉梦 2024-12-11 13:12:40

通过将文本颜色最初设置为灰色并添加用于获得和失去键盘焦点的事件处理程序,在代码隐藏中执行此操作。

TextBox tb = new TextBox();
tb.Foreground = Brushes.Gray;
tb.Text = "Text";
tb.GotKeyboardFocus += new KeyboardFocusChangedEventHandler(tb_GotKeyboardFocus);
tb.LostKeyboardFocus += new KeyboardFocusChangedEventHandler(tb_LostKeyboardFocus);

然后是事件处理程序:

private void tb_GotKeyboardFocus(object sender, KeyboardFocusChangedEventArgs e)
{
    if(sender is TextBox)
    {
        //If nothing has been entered yet.
        if(((TextBox)sender).Foreground == Brushes.Gray)
        {
            ((TextBox)sender).Text = "";
            ((TextBox)sender).Foreground = Brushes.Black;
        }
    }
}


private void tb_LostKeyboardFocus(object sender, KeyboardFocusChangedEventArgs e)
{
    //Make sure sender is the correct Control.
    if(sender is TextBox)
    {
        //If nothing was entered, reset default text.
        if(((TextBox)sender).Text.Trim().Equals(""))
        {
            ((TextBox)sender).Foreground = Brushes.Gray;
            ((TextBox)sender).Text = "Text";
        }
    }
}

Do it in the code-behind by setting the text color initially to gray and adding event handlers for gaining and losing keyboard focus.

TextBox tb = new TextBox();
tb.Foreground = Brushes.Gray;
tb.Text = "Text";
tb.GotKeyboardFocus += new KeyboardFocusChangedEventHandler(tb_GotKeyboardFocus);
tb.LostKeyboardFocus += new KeyboardFocusChangedEventHandler(tb_LostKeyboardFocus);

Then the event handlers:

private void tb_GotKeyboardFocus(object sender, KeyboardFocusChangedEventArgs e)
{
    if(sender is TextBox)
    {
        //If nothing has been entered yet.
        if(((TextBox)sender).Foreground == Brushes.Gray)
        {
            ((TextBox)sender).Text = "";
            ((TextBox)sender).Foreground = Brushes.Black;
        }
    }
}


private void tb_LostKeyboardFocus(object sender, KeyboardFocusChangedEventArgs e)
{
    //Make sure sender is the correct Control.
    if(sender is TextBox)
    {
        //If nothing was entered, reset default text.
        if(((TextBox)sender).Text.Trim().Equals(""))
        {
            ((TextBox)sender).Foreground = Brushes.Gray;
            ((TextBox)sender).Text = "Text";
        }
    }
}
相守太难 2024-12-11 13:12:40

您必须通过继承文本框来创建自定义控件。
下面的链接有一个关于搜索文本框示例的优秀示例。
请查看此

http://davidowens.wordpress。 com/2009/02/18/wpf-search-text-box/

You have to create a custom control by inheriting the textbox.
Below link has an excellent example about the search textbox sample.
Please have a look at this

http://davidowens.wordpress.com/2009/02/18/wpf-search-text-box/

罪歌 2024-12-11 13:12:40

你可以用一种非常简单的方式来做。
这个想法是将标签放置在与文本框相同的位置。如果文本框没有文本并且没有焦点,您的标签将可见。

 <Label Name="PalceHolder"  HorizontalAlignment="Left" HorizontalContentAlignment="Center" VerticalContentAlignment="Center" Height="40" VerticalAlignment="Top" Width="239" FontStyle="Italic"  Foreground="BurlyWood">PlaceHolder Text Here
  <Label.Style>
    <Style TargetType="{x:Type Label}">
      <Setter Property="Visibility" Value="Hidden"/>
      <Style.Triggers>
        <MultiDataTrigger>
          <MultiDataTrigger.Conditions>
            <Condition Binding ="{Binding ElementName=PalceHolder, Path=Text.Length}" Value="0"/>
            <Condition Binding ="{Binding ElementName=PalceHolder, Path=IsFocused}" Value="False"/>
          </MultiDataTrigger.Conditions>
          <Setter Property="Visibility" Value="Visible"/>
        </MultiDataTrigger>
      </Style.Triggers>
    </Style>
  </Label.Style>
</Label>
<TextBox  Background="Transparent" Name="TextBox1" HorizontalAlignment="Left" HorizontalContentAlignment="Center" VerticalContentAlignment="Center" Height="40"TextWrapping="Wrap" Text="{Binding InputText,Mode=TwoWay}" VerticalAlignment="Top" Width="239" />

额外提示:如果您希望文本框具有默认值,请务必在提交数据时设置它(例如:“InputText”=“PlaceHolder Text Here”,如果为空)。

You can do in a very simple way.
The idea is to place a Label in the same place as your textbox. Your Label will be visible if textbox has no text and hasn't the focus.

 <Label Name="PalceHolder"  HorizontalAlignment="Left" HorizontalContentAlignment="Center" VerticalContentAlignment="Center" Height="40" VerticalAlignment="Top" Width="239" FontStyle="Italic"  Foreground="BurlyWood">PlaceHolder Text Here
  <Label.Style>
    <Style TargetType="{x:Type Label}">
      <Setter Property="Visibility" Value="Hidden"/>
      <Style.Triggers>
        <MultiDataTrigger>
          <MultiDataTrigger.Conditions>
            <Condition Binding ="{Binding ElementName=PalceHolder, Path=Text.Length}" Value="0"/>
            <Condition Binding ="{Binding ElementName=PalceHolder, Path=IsFocused}" Value="False"/>
          </MultiDataTrigger.Conditions>
          <Setter Property="Visibility" Value="Visible"/>
        </MultiDataTrigger>
      </Style.Triggers>
    </Style>
  </Label.Style>
</Label>
<TextBox  Background="Transparent" Name="TextBox1" HorizontalAlignment="Left" HorizontalContentAlignment="Center" VerticalContentAlignment="Center" Height="40"TextWrapping="Wrap" Text="{Binding InputText,Mode=TwoWay}" VerticalAlignment="Top" Width="239" />

Bonus:If you want to have default value for your textBox, be sure after to set it when submitting data (for example:"InputText"="PlaceHolder Text Here" if empty).

我不会写诗 2024-12-11 13:12:40

我曾经遇到过同样的情况,我按照以下方法解决了。
我只满足了提示框的要求,您可以通过在其他事件(例如焦点等)上添加效果和其他内容来使其更具交互性。

WPF 代码(我已删除样式以使其可读)

<Grid Margin="0,0,0,0"  Background="White">
    <Label Name="adminEmailHint" Foreground="LightGray" Padding="6"  FontSize="14">Admin Email</Label>
    <TextBox Padding="4,7,4,8" Background="Transparent" TextChanged="adminEmail_TextChanged" Height="31" x:Name="adminEmail" Width="180" />
</Grid>
<Grid Margin="10,0,10,0" Background="White" >
    <Label Name="adminPasswordHint" Foreground="LightGray" Padding="6"  FontSize="14">Admin Password</Label>
    <PasswordBox Padding="4,6,4,8" Background="Transparent" PasswordChanged="adminPassword_PasswordChanged" Height="31" x:Name="adminPassword" VerticalContentAlignment="Center" VerticalAlignment="Center" Width="180" FontFamily="Helvetica" FontWeight="Light" FontSize="14" Controls:TextBoxHelper.Watermark="Admin Password"  FontStyle="Normal" />
</Grid>

C# 代码

private void adminEmail_TextChanged(object sender, TextChangedEventArgs e)
    {
        if(adminEmail.Text.Length == 0)
        {
            adminEmailHint.Visibility = Visibility.Visible;
        }
        else
        {
            adminEmailHint.Visibility = Visibility.Hidden;
        }
    }

private void adminPassword_PasswordChanged(object sender, RoutedEventArgs e)
    {
        if (adminPassword.Password.Length == 0)
        {
            adminPasswordHint.Visibility = Visibility.Visible;
        }
        else
        {
            adminPasswordHint.Visibility = Visibility.Hidden;
        }
    }

I once got into the same situation, I solved it following way.
I've only fulfilled the requirements of a hint box, you can make it more interactive by adding effects and other things on other events like on focus etc.

WPF CODE (I've removed styling to make it readable)

<Grid Margin="0,0,0,0"  Background="White">
    <Label Name="adminEmailHint" Foreground="LightGray" Padding="6"  FontSize="14">Admin Email</Label>
    <TextBox Padding="4,7,4,8" Background="Transparent" TextChanged="adminEmail_TextChanged" Height="31" x:Name="adminEmail" Width="180" />
</Grid>
<Grid Margin="10,0,10,0" Background="White" >
    <Label Name="adminPasswordHint" Foreground="LightGray" Padding="6"  FontSize="14">Admin Password</Label>
    <PasswordBox Padding="4,6,4,8" Background="Transparent" PasswordChanged="adminPassword_PasswordChanged" Height="31" x:Name="adminPassword" VerticalContentAlignment="Center" VerticalAlignment="Center" Width="180" FontFamily="Helvetica" FontWeight="Light" FontSize="14" Controls:TextBoxHelper.Watermark="Admin Password"  FontStyle="Normal" />
</Grid>

C# Code

private void adminEmail_TextChanged(object sender, TextChangedEventArgs e)
    {
        if(adminEmail.Text.Length == 0)
        {
            adminEmailHint.Visibility = Visibility.Visible;
        }
        else
        {
            adminEmailHint.Visibility = Visibility.Hidden;
        }
    }

private void adminPassword_PasswordChanged(object sender, RoutedEventArgs e)
    {
        if (adminPassword.Password.Length == 0)
        {
            adminPasswordHint.Visibility = Visibility.Visible;
        }
        else
        {
            adminPasswordHint.Visibility = Visibility.Hidden;
        }
    }
━╋う一瞬間旳綻放 2024-12-11 13:12:40

另一种方法;-)

这也适用于 PasswordBox。如果您想将其与 TextBox 一起使用,只需将 PasswordChangedTextChanged 交换即可。

XAML:

<Grid>
    <!-- overlay with hint text -->
    <TextBlock Margin="5,2"
                Text="Password"
                Foreground="Gray"
                Name="txtHintPassword"/>
    <!-- enter user here -->
    <PasswordBox Name="txtPassword"
                Background="Transparent"
                PasswordChanged="txtPassword_PasswordChanged"/>
</Grid>

代码隐藏:

private void txtPassword_PasswordChanged(object sender, RoutedEventArgs e)
{
    txtHintPassword.Visibility = Visibility.Visible;
    if (txtPassword.Password.Length > 0)
    {
        txtHintPassword.Visibility = Visibility.Hidden;
    }
}

Another approach ;-)

this works also with PasswordBox. If you want to use it with TextBox, simply exchange PasswordChangedwith TextChanged.

XAML:

<Grid>
    <!-- overlay with hint text -->
    <TextBlock Margin="5,2"
                Text="Password"
                Foreground="Gray"
                Name="txtHintPassword"/>
    <!-- enter user here -->
    <PasswordBox Name="txtPassword"
                Background="Transparent"
                PasswordChanged="txtPassword_PasswordChanged"/>
</Grid>

CodeBehind:

private void txtPassword_PasswordChanged(object sender, RoutedEventArgs e)
{
    txtHintPassword.Visibility = Visibility.Visible;
    if (txtPassword.Password.Length > 0)
    {
        txtHintPassword.Visibility = Visibility.Hidden;
    }
}
画▽骨i 2024-12-11 13:12:40

另一种解决方案是使用 MahApps.Metro 等 WPF 工具包。它有许多不错的功能,例如文本框水印:

Controls:TextBoxHelper.Watermark="Search..."

请参阅http://mahapps.com/controls/textbox.html

Another solution is to use a WPF toolkit like MahApps.Metro. It has many nice features, like a text box watermark:

Controls:TextBoxHelper.Watermark="Search..."

See http://mahapps.com/controls/textbox.html

愚人国度 2024-12-11 13:12:40

我使用了获得和失去焦点事件:

Private Sub txtSearchBox_GotFocus(ByVal sender As System.Object, ByVal e As System.Windows.RoutedEventArgs) Handles txtSearchBox.GotFocus
    If txtSearchBox.Text = "Search" Then
        txtSearchBox.Text = ""
    Else

    End If

End Sub

Private Sub txtSearchBox_LostFocus(ByVal sender As System.Object, ByVal e As System.Windows.RoutedEventArgs) Handles txtSearchBox.LostFocus
    If txtSearchBox.Text = "" Then
        txtSearchBox.Text = "Search"
    Else

    End If
End Sub

效果很好,但文本仍然是灰色的。需要清理。我用的是VB.NET

I used the got and lost focus events:

Private Sub txtSearchBox_GotFocus(ByVal sender As System.Object, ByVal e As System.Windows.RoutedEventArgs) Handles txtSearchBox.GotFocus
    If txtSearchBox.Text = "Search" Then
        txtSearchBox.Text = ""
    Else

    End If

End Sub

Private Sub txtSearchBox_LostFocus(ByVal sender As System.Object, ByVal e As System.Windows.RoutedEventArgs) Handles txtSearchBox.LostFocus
    If txtSearchBox.Text = "" Then
        txtSearchBox.Text = "Search"
    Else

    End If
End Sub

It works well, but the text is in gray still. Needs cleaning up. I was using VB.NET

放血 2024-12-11 13:12:40
  <Grid>
    <TextBox Name="myTextBox"/>
    <TextBlock>
        <TextBlock.Style>
            <Style TargetType="TextBlock">
                <Style.Triggers>
                    <DataTrigger Binding="{Binding ElementName=myTextBox, Path=Text.IsEmpty}" Value="True">
                        <Setter Property="Text" Value="Prompt..."/>
                    </DataTrigger>
                </Style.Triggers>
            </Style>
        </TextBlock.Style>
    </TextBlock>
</Grid>
你的往事 2024-12-11 13:12:40

这是我的看法:

<ControlTemplate>
    <Grid>
        <Grid.Resources>
            <!--Define look / layout for both TextBoxes here. I applied custom Padding and BorderThickness for my application-->
            <Style TargetType="TextBox">
                <Setter Property="Padding" Value="4"/>
                <Setter Property="BorderThickness" Value="2"/>
            </Style>
        </Grid.Resources>

        <TextBox x:Name="TbSearch"/>
        <TextBox x:Name="TbHint" Text="Suche" Foreground="LightGray"
                 Visibility="Hidden" IsHitTestVisible="False" Focusable="False"/>
    </Grid>

    <ControlTemplate.Triggers>
        <MultiTrigger>
            <MultiTrigger.Conditions>
                <Condition SourceName="TbSearch" Property="Text" Value="{x:Static sys:String.Empty}"/>
                <Condition SourceName="TbSearch" Property="IsKeyboardFocused" Value="False"/>
            </MultiTrigger.Conditions>
            <MultiTrigger.Setters>
                <Setter TargetName="TbHint" Property="Visibility" Value="Visible"/>
            </MultiTrigger.Setters>
        </MultiTrigger>

        <MultiTrigger>
            <MultiTrigger.Conditions>
                <Condition SourceName="TbSearch" Property="Text" Value="{x:Null}"/>
                <Condition SourceName="TbSearch" Property="IsKeyboardFocused" Value="False"/>
            </MultiTrigger.Conditions>
            <MultiTrigger.Setters>
                <Setter TargetName="TbHint" Property="Visibility" Value="Visible"/>
            </MultiTrigger.Setters>
        </MultiTrigger>
    </ControlTemplate.Triggers>
</ControlTemplate>

我认为大多数其他答案(包括最重要的答案)都有缺陷。

该解决方案在所有情况下都有效。纯XAML,易于重用。

That's my take:

<ControlTemplate>
    <Grid>
        <Grid.Resources>
            <!--Define look / layout for both TextBoxes here. I applied custom Padding and BorderThickness for my application-->
            <Style TargetType="TextBox">
                <Setter Property="Padding" Value="4"/>
                <Setter Property="BorderThickness" Value="2"/>
            </Style>
        </Grid.Resources>

        <TextBox x:Name="TbSearch"/>
        <TextBox x:Name="TbHint" Text="Suche" Foreground="LightGray"
                 Visibility="Hidden" IsHitTestVisible="False" Focusable="False"/>
    </Grid>

    <ControlTemplate.Triggers>
        <MultiTrigger>
            <MultiTrigger.Conditions>
                <Condition SourceName="TbSearch" Property="Text" Value="{x:Static sys:String.Empty}"/>
                <Condition SourceName="TbSearch" Property="IsKeyboardFocused" Value="False"/>
            </MultiTrigger.Conditions>
            <MultiTrigger.Setters>
                <Setter TargetName="TbHint" Property="Visibility" Value="Visible"/>
            </MultiTrigger.Setters>
        </MultiTrigger>

        <MultiTrigger>
            <MultiTrigger.Conditions>
                <Condition SourceName="TbSearch" Property="Text" Value="{x:Null}"/>
                <Condition SourceName="TbSearch" Property="IsKeyboardFocused" Value="False"/>
            </MultiTrigger.Conditions>
            <MultiTrigger.Setters>
                <Setter TargetName="TbHint" Property="Visibility" Value="Visible"/>
            </MultiTrigger.Setters>
        </MultiTrigger>
    </ControlTemplate.Triggers>
</ControlTemplate>

Most other answers including the top one have flaws in my opinion.

This solution works under all circumstances. Pure XAML, easily reusable.

ヅ她的身影、若隐若现 2024-12-11 13:12:40

您可以在 Nuget 中使用 Material Design 及其库。
该库默认提供了此功能,并且它还具有聚焦模式下的动画。代码如下:

<TextBox
    MaxWidth="400"
    VerticalAlignment="Top"
    materialDesign:HintAssist.Hint="Floating hint in a box that will cut off"
    AcceptsReturn="True"
    IsEnabled="{Binding Path=IsChecked, ElementName=MaterialDesignFilledTextBoxEnabledComboBox}"
    Style="{StaticResource MaterialDesignFilledTextBox}"
    TextWrapping="Wrap" />

显示如下。

输入图片此处描述 在此处输入图像描述

you can use Material Design and its library in Nuget.
This library provided this feature by default, and it also has animation in focused mode. The code is as follows:

<TextBox
    MaxWidth="400"
    VerticalAlignment="Top"
    materialDesign:HintAssist.Hint="Floating hint in a box that will cut off"
    AcceptsReturn="True"
    IsEnabled="{Binding Path=IsChecked, ElementName=MaterialDesignFilledTextBoxEnabledComboBox}"
    Style="{StaticResource MaterialDesignFilledTextBox}"
    TextWrapping="Wrap" />

And it is displayed as below.

enter image description here enter image description here

情场扛把子 2024-12-11 13:12:40

我使用 VisualBrushsellmeadog 建议的 Style 中的一些触发器来完成此操作。

<TextBox>
        <TextBox.Style>
            <Style TargetType="TextBox" xmlns:sys="clr-namespace:System;assembly=mscorlib">
                <Style.Resources>
                    <VisualBrush x:Key="CueBannerBrush" AlignmentX="Left" AlignmentY="Center" Stretch="None">
                        <VisualBrush.Visual>
                            <Label Content="Search" Foreground="LightGray" />
                        </VisualBrush.Visual>
                    </VisualBrush>
                </Style.Resources>
                <Style.Triggers>
                    <Trigger Property="Text" Value="{x:Static sys:String.Empty}">
                        <Setter Property="Background" Value="{StaticResource CueBannerBrush}" />
                    </Trigger>
                    <Trigger Property="Text" Value="{x:Null}">
                        <Setter Property="Background" Value="{StaticResource CueBannerBrush}" />
                    </Trigger>
                    <Trigger Property="IsKeyboardFocused" Value="True">
                        <Setter Property="Background" Value="White" />
                    </Trigger>
                </Style.Triggers>
            </Style>
        </TextBox.Style>
    </TextBox>

@sellmeadog:应用程序正在运行,bt 设计未加载...出现以下错误:
类型引用不明确。名为“StaticExtension”的类型至少出现在两个命名空间中:“MS.Internal.Metadata.ExposedTypes.Xaml”和“System.Windows.Markup”。考虑调整程序集 XmlnsDefinition 属性。
我正在使用 .net 3.5

I accomplish this with a VisualBrush and some triggers in a Style suggested by :sellmeadog.

<TextBox>
        <TextBox.Style>
            <Style TargetType="TextBox" xmlns:sys="clr-namespace:System;assembly=mscorlib">
                <Style.Resources>
                    <VisualBrush x:Key="CueBannerBrush" AlignmentX="Left" AlignmentY="Center" Stretch="None">
                        <VisualBrush.Visual>
                            <Label Content="Search" Foreground="LightGray" />
                        </VisualBrush.Visual>
                    </VisualBrush>
                </Style.Resources>
                <Style.Triggers>
                    <Trigger Property="Text" Value="{x:Static sys:String.Empty}">
                        <Setter Property="Background" Value="{StaticResource CueBannerBrush}" />
                    </Trigger>
                    <Trigger Property="Text" Value="{x:Null}">
                        <Setter Property="Background" Value="{StaticResource CueBannerBrush}" />
                    </Trigger>
                    <Trigger Property="IsKeyboardFocused" Value="True">
                        <Setter Property="Background" Value="White" />
                    </Trigger>
                </Style.Triggers>
            </Style>
        </TextBox.Style>
    </TextBox>

@sellmeadog :Application running, bt Design not loading...the following Error comes:
Ambiguous type reference. A type named 'StaticExtension' occurs in at least two namespaces, 'MS.Internal.Metadata.ExposedTypes.Xaml' and 'System.Windows.Markup'. Consider adjusting the assembly XmlnsDefinition attributes.
'm using .net 3.5

云醉月微眠 2024-12-11 13:12:40

对于WPF来说,没有办法。你必须模仿它。 查看此示例。第二种(不稳定的解决方案)是托管一个继承自 TextBox 的 WinForms 用户控件,并将 EM_SETCUEBANNER 消息发送到编辑控件。 IE。

[DllImport("user32.dll", CharSet = CharSet.Auto)]
private static extern IntPtr SendMessage(IntPtr hWnd, Int32 msg, IntPtr wParam, IntPtr lParam);

private const Int32 ECM_FIRST = 0x1500;
private const Int32 EM_SETCUEBANNER = ECM_FIRST + 1;

private void SetCueText(IntPtr handle, string cueText) {
    SendMessage(handle, EM_SETCUEBANNER, IntPtr.Zero, Marshal.StringToBSTR(cueText));
}

public string CueText {
    get {
        return m_CueText;
    } 
    set {
        m_CueText = value;
        SetCueText(this.Handle, m_CueText);
}

另外,如果您想托管 WinForm 控制方法,我有一个已经包含此实现的框架,称为 BitFlex Framework,您可以 在此处免费下载

如果您想了解更多信息,这里有一篇关于 BitFlex 的文章。您将开始发现,如果您正在寻找 Windows 资源管理器样式的控件,那么它通常永远不会开箱即用,并且由于 WPF 通常不与句柄一起使用,因此您无法像您一样围绕 Win32 或现有控件编写简单的包装器与 WinForms。

截屏:
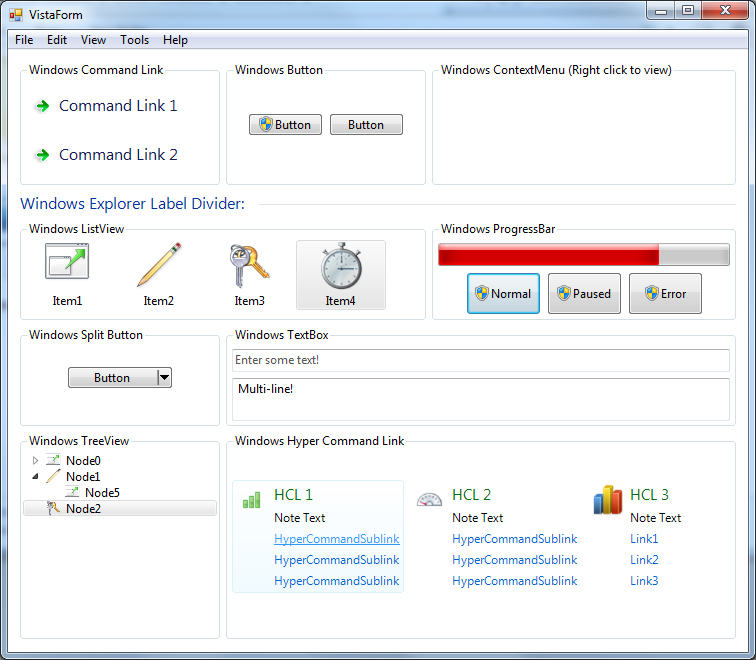
在此处输入图像描述

For WPF, there isn't a way. You have to mimic it. See this example. A secondary (flaky solution) is to host a WinForms user control that inherits from TextBox and send the EM_SETCUEBANNER message to the edit control. ie.

[DllImport("user32.dll", CharSet = CharSet.Auto)]
private static extern IntPtr SendMessage(IntPtr hWnd, Int32 msg, IntPtr wParam, IntPtr lParam);

private const Int32 ECM_FIRST = 0x1500;
private const Int32 EM_SETCUEBANNER = ECM_FIRST + 1;

private void SetCueText(IntPtr handle, string cueText) {
    SendMessage(handle, EM_SETCUEBANNER, IntPtr.Zero, Marshal.StringToBSTR(cueText));
}

public string CueText {
    get {
        return m_CueText;
    } 
    set {
        m_CueText = value;
        SetCueText(this.Handle, m_CueText);
}

Also, if you want to host a WinForm control approach, I have a framework that already includes this implementation called BitFlex Framework, which you can download for free here.

Here is an article about BitFlex if you want more information. You will start to find that if you are looking to have Windows Explorer style controls that this generally never comes out of the box, and because WPF does not work with handles generally you cannot write an easy wrapper around Win32 or an existing control like you can with WinForms.

Screenshot:
enter image description here

~没有更多了~
我们使用 Cookies 和其他技术来定制您的体验包括您的登录状态等。通过阅读我们的 隐私政策 了解更多相关信息。 单击 接受 或继续使用网站,即表示您同意使用 Cookies 和您的相关数据。
原文