java 哪个布局管理器适合这个任务?
我有一个 JPanel 父级,里面有 3 个 JPanel 子级。它们目前都使用 GridLayout 并共同表示一个 UML 类。问题是,当我添加新属性或方法时,所有 3 个 JPanel 都会增长到相同的大小。
期望的行为是:
- 每当添加方法或属性时,标题框的大小始终保持不变。
- 添加方法后,只有方法面板会增大,标题和属性面板的大小保持不变。
- 添加属性后,只有属性面板会增长,其他面板大小保持不变。
每当添加方法/属性时,父 JPanel 就可以自动增大/缩小。我正在摆弄 GridBagLayout atm,但离预期结果还差得很远。
有没有一种简单(或更简单)的方法可以解决这个问题?
这是几张照片来展示我的情况。
新创建的 UML 类 => 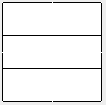 这是它当前的行为方式 =>
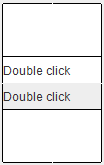
但我想要这个 => 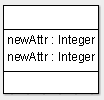 或 this=>
 或此 =>
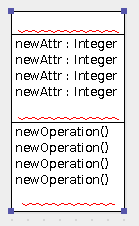
Edit2:添加了新图片明晰。如果原始版本有误导性,我深感抱歉。
编辑3:是的!我已经整理好了!感觉就像永远!这是 SSEEC:
子面板
    import java.awt.Component;
import java.awt.Container;
import java.awt.GridLayout;
import java.awt.event.MouseEvent;
import javax.swing.JPanel;
import javax.swing.JTextField;
import javax.swing.event.MouseInputAdapter;
import javax.swing.event.MouseInputListener;

    public class APanel extends JPanel{
        private JTextField tf;

    public APanel() {
        this.setLayout(new GridLayout(0,1));
        this.addMouseListener(mouseInputListener);
      }

    MouseInputListener mouseInputListener = new MouseInputAdapter() {
        @Override
        public void mouseClicked(MouseEvent e) {
        System.out.println("Adding a new text field!");
        tf = MyTF.create("Double click");
        addNewTF(tf);
        Component source = (Component) e.getSource();
        Container c = source.getParent();
        while(true) {
            if(c instanceof PPanel)
                break;
            else
                c=c.getParent();
        }
        PPanel p = (PPanel) c;
        p.expand();
        }
    };

    public void addNewTF(JTextField tf) {
        this.add(tf);
        this.setSize(this.getWidth(), this.getHeight()+tf.getHeight());
        this.revalidate();
        this.repaint();

    }
}
父面板:
    import java.awt.Color;
import java.awt.Dimension;
import java.awt.GridLayout;
import javax.swing.BorderFactory;
import javax.swing.Box;
import javax.swing.BoxLayout;
import javax.swing.JFrame;
import javax.swing.JPanel;
import javax.swing.JTextField;

public class PPanel extends JPanel{
    //private APanel panel1;
    private JPanel panel1;
    private APanel panel2;
    private APanel panel3;
    public PPanel() {

        this.setLayout(new BoxLayout(this , BoxLayout.Y_AXIS));
        this.setBackground(Color.black);

        panel1 = new JPanel();
        panel1.setLayout(new GridLayout(0,1));
        panel1.add(new JTextField("title"));
        panel2 = new APanel();
        panel2.setBorder(BorderFactory.createLineBorder(Color.red));
        panel3 = new APanel();
        panel3.setBorder(BorderFactory.createLineBorder(Color.black));

        this.add(panel1);
        this.add(Box.createRigidArea(new Dimension(0,1)));
        this.add(panel2);
        this.add(panel3);


    }
    public void expand() {
        this.setSize(this.getWidth(), this.getHeight()+33);
        this.revalidate();
        this.repaint();
    }
    public static void main(String[] args) {
        JFrame frame = new JFrame();
        PPanel panel = new PPanel();
        panel.setBounds(10, 10, 100, 150);
        JPanel c = new JPanel(null);
        c.add(panel);
        frame.add(c);
        frame.pack();
        frame.setDefaultCloseOperation(JFrame.EXIT_ON_CLOSE);
        frame.setSize(new Dimension(350, 300));
        frame.setTitle("Demo");
        frame.setLocationRelativeTo(null);
        frame.setVisible(true);
    }
}
一个帮助类:
    import java.awt.Component;
import java.awt.Container;
import java.awt.Dimension;
import java.awt.event.MouseEvent;
import javax.swing.JTextField;
import javax.swing.event.MouseInputAdapter;
import javax.swing.event.MouseInputListener;

public class MyTF {
    public static JTextField create(String name) {
        final JTextField tf = new JTextField(name);
        System.out.println(tf.getPreferredSize());
        tf.setPreferredSize(new Dimension(100,33));
        tf.addMouseListener(mouseInputListener);
        return tf;
    }

    static MouseInputListener mouseInputListener = new MouseInputAdapter() {
        @Override
            public void mouseClicked(MouseEvent e) {
                Component source = (Component) e.getSource();
                Container c = source.getParent();
                while(true) {
                    if(c instanceof PPanel)
                        break;
                    else if(c instanceof APanel)
                    {
                        c.dispatchEvent(e);
                        c = c.getParent();
                        break;

                    }
                    else
                        c=c.getParent();
                }
                c.dispatchEvent(e);
        }

    };
}
我放弃了使用 GridBagLayout 的努力,这对我来说实在是太多了。然后我按照建议尝试了 borderLayout 但也无法让它像我想要的那样工作。最后是 BoxLayout,它应该可以工作,但我的代码中有一个错误!因此,当我尝试 0verbose 代码建议并使用它时,它失败了!直到我完成了 SSEEC,在我决定发布之前进行了最终编译并运行它(此时我几乎放弃了),然后我意识到它起作用了......可以在自己的空间中生长的面板,它们互不干扰。
我当时就想WTF!
回到我的代码并比较它 SSEEC,发现有一个错误,扩展面板高度的代码位于错误的位置,所以它们有点像蚕食彼此的空间。
更好了!我可以指定中间框与其上方和下方框之间的距离一像素。这意味着我仍然可以使用 mKorbel 的技巧来绘制分隔这些盒子的后线!
编辑4:有没有办法让我设置组件的大小?如果您运行 SSEEC,您会发现一旦添加了 JTextField,它就非常巨大!比容器还大...
I have a JPanel parent with 3 JPanel children inside. They all currently make use of GridLayout and together represent a UML class. Problem is that when I add a new attribute or method, all 3 JPanel grow to the same size.
Desire behaviour is that:
- The title box's size always remain the same whenever a method or attribute is added.
- When a method is added, only the method panel grows and title and attribute panel's size stay the same.
- When an attribute is added, only the attribute panel grows and other panels size stay the same.
The parent JPanel already can automatically grow/shrink whenever a method/attribute is added. I'm toying around with GridBagLayout atm but I'm getting nowhere near the desire results.
Is there a simple (or simpler) way for me to solve this?!
Here is few pics to show my situation.
A newly created UML class => this is how it currently behaves =>
But I want this =>  or this=>
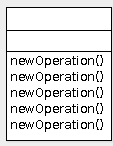 or this =>
Edit2: added new pics for clarity. Im terribly sorry if original version was misleading.
Edit3: YESS! I have sorted it! Felt like forever!! Here is the SSEEC:
Child panel
    import java.awt.Component;
import java.awt.Container;
import java.awt.GridLayout;
import java.awt.event.MouseEvent;
import javax.swing.JPanel;
import javax.swing.JTextField;
import javax.swing.event.MouseInputAdapter;
import javax.swing.event.MouseInputListener;

    public class APanel extends JPanel{
        private JTextField tf;

    public APanel() {
        this.setLayout(new GridLayout(0,1));
        this.addMouseListener(mouseInputListener);
      }

    MouseInputListener mouseInputListener = new MouseInputAdapter() {
        @Override
        public void mouseClicked(MouseEvent e) {
        System.out.println("Adding a new text field!");
        tf = MyTF.create("Double click");
        addNewTF(tf);
        Component source = (Component) e.getSource();
        Container c = source.getParent();
        while(true) {
            if(c instanceof PPanel)
                break;
            else
                c=c.getParent();
        }
        PPanel p = (PPanel) c;
        p.expand();
        }
    };

    public void addNewTF(JTextField tf) {
        this.add(tf);
        this.setSize(this.getWidth(), this.getHeight()+tf.getHeight());
        this.revalidate();
        this.repaint();

    }
}
Parent panel:
    import java.awt.Color;
import java.awt.Dimension;
import java.awt.GridLayout;
import javax.swing.BorderFactory;
import javax.swing.Box;
import javax.swing.BoxLayout;
import javax.swing.JFrame;
import javax.swing.JPanel;
import javax.swing.JTextField;

public class PPanel extends JPanel{
    //private APanel panel1;
    private JPanel panel1;
    private APanel panel2;
    private APanel panel3;
    public PPanel() {

        this.setLayout(new BoxLayout(this , BoxLayout.Y_AXIS));
        this.setBackground(Color.black);

        panel1 = new JPanel();
        panel1.setLayout(new GridLayout(0,1));
        panel1.add(new JTextField("title"));
        panel2 = new APanel();
        panel2.setBorder(BorderFactory.createLineBorder(Color.red));
        panel3 = new APanel();
        panel3.setBorder(BorderFactory.createLineBorder(Color.black));

        this.add(panel1);
        this.add(Box.createRigidArea(new Dimension(0,1)));
        this.add(panel2);
        this.add(panel3);


    }
    public void expand() {
        this.setSize(this.getWidth(), this.getHeight()+33);
        this.revalidate();
        this.repaint();
    }
    public static void main(String[] args) {
        JFrame frame = new JFrame();
        PPanel panel = new PPanel();
        panel.setBounds(10, 10, 100, 150);
        JPanel c = new JPanel(null);
        c.add(panel);
        frame.add(c);
        frame.pack();
        frame.setDefaultCloseOperation(JFrame.EXIT_ON_CLOSE);
        frame.setSize(new Dimension(350, 300));
        frame.setTitle("Demo");
        frame.setLocationRelativeTo(null);
        frame.setVisible(true);
    }
}
A helping class:
    import java.awt.Component;
import java.awt.Container;
import java.awt.Dimension;
import java.awt.event.MouseEvent;
import javax.swing.JTextField;
import javax.swing.event.MouseInputAdapter;
import javax.swing.event.MouseInputListener;

public class MyTF {
    public static JTextField create(String name) {
        final JTextField tf = new JTextField(name);
        System.out.println(tf.getPreferredSize());
        tf.setPreferredSize(new Dimension(100,33));
        tf.addMouseListener(mouseInputListener);
        return tf;
    }

    static MouseInputListener mouseInputListener = new MouseInputAdapter() {
        @Override
            public void mouseClicked(MouseEvent e) {
                Component source = (Component) e.getSource();
                Container c = source.getParent();
                while(true) {
                    if(c instanceof PPanel)
                        break;
                    else if(c instanceof APanel)
                    {
                        c.dispatchEvent(e);
                        c = c.getParent();
                        break;

                    }
                    else
                        c=c.getParent();
                }
                c.dispatchEvent(e);
        }

    };
}
I gave up the efford playing with GridBagLayout, it was just too much for me. Then I tried borderLayout as suggested but couldn't get it to work like I want it either. Then finally BoxLayout, it should had worked but there was a bug in my code! So when I tried out 0verbose code suggest and playing around with it, it failed! Not until, I finished up the SSEEC, did the final compile and run it before I decided to post (I practically gave up at this point) then I realised that it worked...The panel that can grow in their own space, they dont interfere with each other.
I was like WTF!
Went back to my code and compared it SSEEC and there was a bug, the code to expand the height of the panel was in wrong place so they sort of like eating into each other spaces.
Better yet! I can specify the distance between the middle box with the box above and below it by one pixel. That means I can still use the trick by mKorbel to draw the back line seperating those boxes!
Edit 4: is there a way for me to set size of a component? If you run the SSEEC, you will notice that once the JTextField is added in, it's huge! It's bigger than the container...
如果你对这篇内容有疑问,欢迎到本站社区发帖提问 参与讨论,获取更多帮助,或者扫码二维码加入 Web 技术交流群。

绑定邮箱获取回复消息
由于您还没有绑定你的真实邮箱,如果其他用户或者作者回复了您的评论,将不能在第一时间通知您!


发布评论
评论(4)
我建议你使用BoxLayout。这是一个教程。使用胶水和刚性区域,您可以获得几乎所有所需的布局。在您的情况下,代码应该是这样的:
当您需要插入一个新的子项时,请记住将其插入到正确的位置:在胶水之一和 childCenter 之间。
例如:
I suggest you to use BoxLayout. Here's a tutorial. Playing around with glues and rigid area you can obtain almost all desired layout. In your case the code should be somthing like this:
When you need to insert a new child, remember to insert it into the right position: between one of the glues and childCenter.
For example:
也许通过使用 BorderLayout 你可以做到这一点
(关于基本内容的示例
revalidate(); + repaint();与pack();)来自代码
maybe this by using BorderLayout you can do that
(example about basic stuff
revalidate(); + repaint();versuspack();)from code
不幸的是,我不能 100% 确定我理解你的布局。如果能附上图片就更好了。
但是,如果网格布局的增长不符合您的要求,您可以使用几乎可以完成所有操作但有点复杂的 GridBagLayout,或者使用 Border 和其他布局的组合。
也许几种边框布局可以帮助你。在这个布局中,中心增长较快,而北、南、西、东增长较慢。尝试使用它们。
也检查 BoxLayout。
如果您要创建大量复杂的对话框,请查看 MigLayout。尽管存在一些学习曲线,但这种布局确实可以帮助您节省时间和时间。
既然你现在更新了你的问题,我可以肯定地说你可以定义 BorderLayout,包括北、南和中心。
中心将包含 2 行网格布局。每行将再次包含边框布局。上边框布局将包含南部的其他面板。下边界布局将包含北部边界布局。
每个布局都将包含另一个边框布局,其中标签位于西部,文本字段位于中心。
Unfortunately I am not 100% sure I understood your layout. It will be better if you can attach picture.
But if Grid Layout grows not as you want you can either use GridBagLayout that can do almost everything but a little bit complicated or use a combination of Border and other layouts.
Probably several border layout can help you. In this layout center is growing fast while north, south, west and east are growing slower. Try to use them.
Check BoxLayout too.
If you are going to create a lot of complicated dialog boxes check out MigLayout. Although some learning curve exists this layout can really help you to save hours and days.
Since you updated your question now I can definitely say that you can define BorderLayout, with North, South and Center.
Center will contain Grid layout with 2 rows. Each row will contain Border layeout again. The upper border layout will contain other pannel in the south. The lower border layout willcontaint border layout in the North.
Each one of that layouts will contain yet another border layouy with label in the west and text field in the center.
您可以为此使用 GridBagLayout。我认为对我有用的是
You can use a GridBagLayout for this. I think what worked for me was