以编程方式创建 uitableview
您好,我目前正在测试如何开发一个应用程序,该应用程序具有多个表视图,这些表视图具有自己的父/子结构,可以从主菜单访问这些表视图。
我想知道如何使用 uinavigationcontroller 菜单生成新的表格视图,但共享 uitabbar,因为这是我第一次尝试这样的事情,通常我只是坚持使用苹果模板。
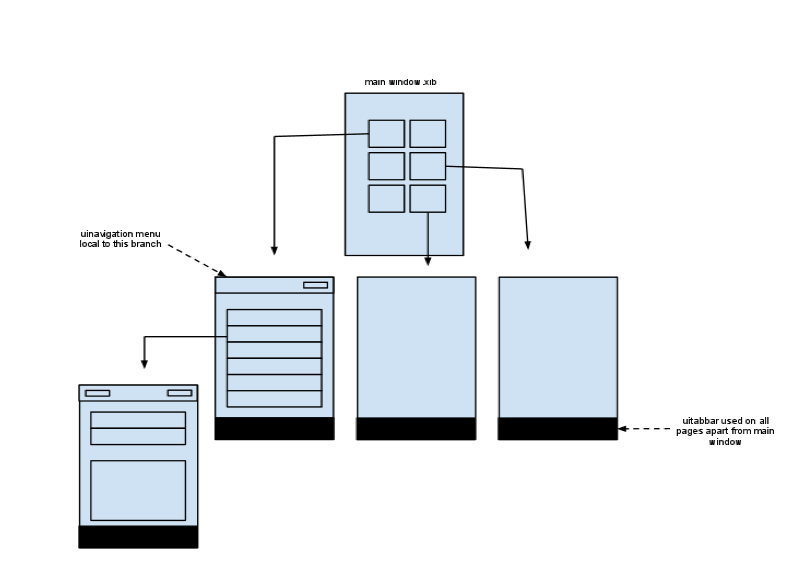
这是我想要实现的目标的一般说明,任何评论建议代码示例将不胜感激,从那里我可以自己完成它,更多的问题是我到底从哪里开始:)

到目前为止,我已经使用 UIAction 设置了主窗口来捕获不同的按钮点击,我需要弄清楚如何让所有的孩子共享特定的 UITabbar 以及如何设置以便各个分支在需要时拥有自己的 UINavigationController 菜单。
这是我的 UIAction
//Delegate.m
//--- Caputer button clicks ---
- (IBAction)buttonClick: (UIButton *) sender
{
    if ([sender isEqual:orangeButton]) {
        NSLog(@"orangeButton Pressed");
    }
    else if ([sender isEqual:blueButton]) {
        NSLog(@"blueButton Pressed");
    }
    else if ([sender isEqual:greenButton]) {
        NSLog(@"greenButton Pressed");
    }
    else if ([sender isEqual:purpuleButton]) {
        NSLog(@"purpleButton Pressed");
    }
}
Hi there I am currently testing how to develop an application that has several tableviews with their own parent/child structures that are accessed from a main menu.
I would like to know how to generate the new tableview with the uinavigationcontroller menu but a shared uitabbar as this is the first time I have tried anything like this normally I just stick with apples templates.
Here is a general acitecture of what I am wanting to achieve, any comments suggestions code example would be greatly appreciated and from there I can work through it myself, its more of a question as to where the heck do I start :)

So far I have the main window set up with a UIAction catching the different button clicks, I need to figure out how to allow all children to share the specific UITabbar and then how to set up so that individual branches have their own UINavigationController menu if needed.
this is my UIAction
//Delegate.m
//--- Caputer button clicks ---
- (IBAction)buttonClick: (UIButton *) sender
{
    if ([sender isEqual:orangeButton]) {
        NSLog(@"orangeButton Pressed");
    }
    else if ([sender isEqual:blueButton]) {
        NSLog(@"blueButton Pressed");
    }
    else if ([sender isEqual:greenButton]) {
        NSLog(@"greenButton Pressed");
    }
    else if ([sender isEqual:purpuleButton]) {
        NSLog(@"purpleButton Pressed");
    }
}
如果你对这篇内容有疑问,欢迎到本站社区发帖提问 参与讨论,获取更多帮助,或者扫码二维码加入 Web 技术交流群。

绑定邮箱获取回复消息
由于您还没有绑定你的真实邮箱,如果其他用户或者作者回复了您的评论,将不能在第一时间通知您!

发布评论
评论(3)
如果您创建了“基于 TabBar 的应用程序”,那么为所需选项卡添加 navigationController 非常简单。将“UINavigationController”拖动到主窗口中的“标签栏控制器”内部:
至于“如何生成tableViews”,最简单的方法是创建一个通用的TableView,将其命名为LevelTableView.h/.m文件(并且它可以有自己的.xib),其中你可以添加您想要的任何内容,然后继续创建新的 ViewController,例如,在此 tableView 的某个级别中:
要点是,此“LevelTableView”创建一次,但为您要添加的每个级别实例化不同的时间,内容是唯一改变的事情。
If you created a "TabBar based application", then adding the navigationController for the desired tab is pretty easy. Drag the "UINavigationController" inside the "Tab Bar Controller" in the Main Window:
As to "How to generate tableViews", the simplest way, is to create a generic TableView, call it LevelTableView.h/.m file (and it could have its own .xib), where you can add whatever you wish, and then, keep creating new ViewControllers, for instance, in a level of this tableView:
The point is, that this "LevelTableView" is created once, but instantiated various time for each level you want to add, the content is the only thing that changes.
我确实有类似的东西。我所做的是创建一个不同的类,我称之为“TabBarController”,并在其中初始化将进入我的选项卡的所有不同视图:
然后,当用户单击主视图中的一个按钮时,这就是我所做的:
工作做得非常好。
I have exactly something like that. What I do is that I created a different class which I call "TabBarController" and where I initialize all the different views that are going to my tabs:
Then when the user clicks on one of the buttons in the main view this is what I do:
Does the job pretty nicely.
将导航控制器添加到选项卡栏控制器中。然后隐藏
NavigationController并根据您的架构使用工具栏来弹出和导航您的视图。Add the Navigation Controllers into the tabbar controller. Then Hide the
NavigationControllerand according to your schema use toolbars to pop and navigate your views.