LVM:扩展物理卷(VMWare下)
我在 VMware 下有一个虚拟服务器,我从 sysadm 那里获得了 10 GB 的硬盘。
在 Linux 内部(运行 Ubuntu 11.04 服务器),一切都是通过 LVM 设置的。在 [c]fdisk 中,我确实发现了这些额外的 10 GB - 它们直接位于主 LVM 分区之后。
我知道我可以用这个额外的空间创建一个新的 LVM 分区,然后将其添加到卷组,然后添加到逻辑卷,然后调整文件系统的大小。
然而,是否有可能将这些额外的空间吸收到现有的 LVM 分区中?这样 LVM 的物理卷视图就会增加,而不是将另一个物理卷添加到卷组中(最好自动渗透到卷组)?
I have a virtual server under VMware, where I got 10 more GB harddisk from the sysadm.
Inside Linux (running Ubuntu 11.04 server), things are set up with LVM. In [c]fdisk, I do find these extra 10 gigs - they are present directly after the primary LVM partition.
I understand that I could make a new LVM partition out of this extra space, and then add this to the volume group, and then to the logical volume, and then resize the filesystem.
However, is it possible to assimilate these extra gigs into the existing LVM partition? So that the LVM's view of the physical volume increased instead of adding another physical volume into the volume group (preferably automatically percolating up to the volume group)?
如果你对这篇内容有疑问,欢迎到本站社区发帖提问 参与讨论,获取更多帮助,或者扫码二维码加入 Web 技术交流群。

绑定邮箱获取回复消息
由于您还没有绑定你的真实邮箱,如果其他用户或者作者回复了您的评论,将不能在第一时间通知您!


发布评论
评论(5)
我刚刚在 /dev/sda2 上构建了一个带有 15GB 磁盘和 LVM 的测试虚拟机。然后我将磁盘增加到 20GB,并使 LVM 看到额外的 5GB,而无需添加另一个物理卷。
以下是我遵循的步骤:
我必须使用 gfdisk 才能使整个过程正常进行。 “标准”fdisk 没有运气。
切换到“扇区”为单位(这很关键!!!)并打印分区表:
记下“Linux LVM”分区的“起始”扇区(/开发/vda2)。
删除分区并使用相同的“开始”扇区(501758)和相同的分区类型(8e)重新创建它:
警告:请注意,我不接受分区的默认开始扇区,我手动输入它 使其与原始值相符!不过,我确实接受了“最后一个扇区”的默认值,因为我希望该分区与磁盘一样大。
使用“p”验证您是否正确执行了所有操作并将新分区表写入磁盘:
重新启动虚拟机。
现在登录虚拟机并运行:
完成!现在运行 vgdisplay,您将看到额外的 5GB 可用作为免费扩展。
注意:
I just built a test virtual machine with a 15GB disk and LVM on /dev/sda2. Then I grew the disk to 20GB and made LVM see the extra 5GB without adding another physical volume.
Here are the steps I followed:
I had to use gfdisk to make the whole thing work. No luck with the "standard" fdisk.
Switch to "sectors" as the unit (this is critical!!!) and print the partition table:
Write down the "start" sector of the "Linux LVM" partition (/dev/vda2).
Delete the partition and recreate it using the same "start" sector (501758) and the same partition type (8e):
WARNING: please note that I didn't accept the default start sector for the partition, I entered it manually so that it matches the original value! I did accept the default value for the "last sector" though, because I want this partition to be as large as the disk.
Verify that you did everything correctly with "p" and write the new partition table to disk:
Reboot the virtual machine.
Now log-in the virtual machine and run:
Done! Now run vgdisplay and you will see the extra 5GB available as free extents.
CAVEATS:
以下是我在做同样的事情时经常使用的说明......
1) 确保您已经对虚拟机磁盘进行了扩容。
2) 执行“fdisk /dev/sda”
3) 重新启动
4) 运行“pvcreate /dev/sda3”
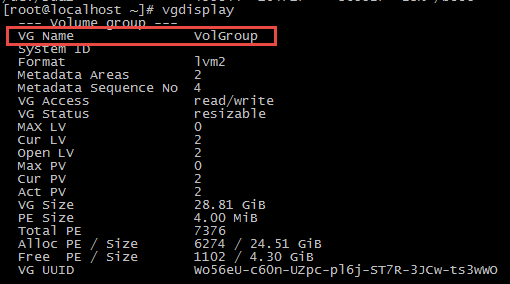
5) 运行“vgdisplay”以获取卷组的名称。在此示例中,它是“VolGroup”,如下所示:

6) 运行 vgextend VolGroup /dev/sda3
7) 运行“df”查看根卷组的名称.

8) 运行 lvextend /dev/mapper/VolGroup-lv_root -r -l+100%FREE
((-r) 选项也会导致其格式化)
9 运行“df –h”来查看新的磁盘空间
Here are the instructions I always use when I'm doing the same thing...
1) Make sure you have expanded the VM disk.
2) do “fdisk /dev/sda”
3) REBOOT
4) run ‘pvcreate /dev/sda3’
5) run ‘vgdisplay’ to get the name of the volume group. In this example, it’s “VolGroup”, as in:

6) run vgextend VolGroup /dev/sda3
7) run “df” to see the name of the root volume group.

8) run lvextend /dev/mapper/VolGroup-lv_root -r -l+100%FREE
( the (-r) option causes it to format it, too)
9 run “df –h” to see your new disk space
这是我更喜欢在虚拟机上拥有一个与 /boot 和其他初始部分分开的大物理卷的原因之一。这允许您将整个磁盘创建为 LVM 物理磁盘 (
pvcreate /dev/sdb)。然后,如果您需要调整大小,则不需要进行任何文件系统更改,因为它直接位于磁盘上。在这种情况下,您只需运行
pvresize /dev/sdb并继续执行 vgextend、lvextend 和 resize2fs。维护起来更简单。This is one of the reasons I prefer to have one big physical volume on the VMs that is separate from the /boot and other initial parts. This allows you to create a whole disk as an LVM physical disk (
pvcreate /dev/sdb). Then if you need to do a resize, none of the file system changes need to happen because it is directly on disk.In that scenario, you simply run
pvresize /dev/sdband move on with your vgextend, lvextend and resize2fs. Much simpler to maintain.就我个人而言,我遵循了此博客中的说明。
总结一下步骤:
vmware-vdiskmanager增加虚拟磁盘大小为了扩展我的 Linux VM (RedHat EL 6),我确实在 GParted ISO 映像上启动(来自 此处 )并且我能够扩展我想要的分区。请注意,最后我必须移动我想要不变的分区。
我的一位同事也很安全,但我建议在运行 Gparted Linux 之前备份虚拟机。
Personally I followed the instruction in this blog.
To summarize the steps:
vmware-vdiskmanagerFor expanding my Linux VM (RedHat EL 6) I did boot on the GParted ISO image (from here) and I was able to extend the partition I wanted. Note I had to move the partition I wanted unchanged at the end.
It was safe with one of my colleague as well, but I would recommand to backup the VM before running Gparted Linux.
无需重启即可扩展磁盘
extend disk without reboot