沿路径使用渐变
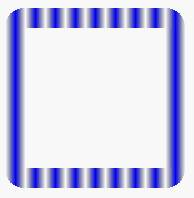
我正在尝试使用 Android Path 类创建“发光”效果。然而,渐变并没有被扭曲以适应路径。相反,它只是显示在它的“上方”并剪切到路径的笔画。使用方形路径,下图显示了我的意思:

相反,它应该看起来更像这样:

换句话说,渐变遵循路径,特别是根据半径设置围绕拐角在 CornerPathEffect 中。
这是代码的相关部分:
paint = new Paint();
paint.setStyle(Style.STROKE);
paint.setStrokeWidth(20);
paint.setAntiAlias(true);
LinearGradient gradient = new LinearGradient(30, 0, 50, 0,
    new int[] {0x00000000, 0xFF0000FF, 0x00000000}, null, Shader.TileMode.MIRROR);
paint.setShader(gradient);
PathEffect cornerEffect = new CornerPathEffect(10);
paint.setPathEffect(cornerEffect);
canvas.drawPath(boxPath, paint);
有什么想法吗?
另一种选择是在定义笔划宽度时获得“软边画笔”效果。我尝试过 BlurMaskFilters,但它们提供了均匀的模糊,而不是从不透明到透明的过渡。有谁知道这是否可能?
I'm trying to create a 'glow' effect using the Android Path class. However, the gradient is not being warped to fit around the path. Instead, it is simply being display 'above' it and clipped to the path's stroke. Using a square path, the image below shows what I mean:

Instead, that should look more like this:

In other words, the gradient follows the path, and in particular wraps around the corners according to the radius set in the CornerPathEffect.
Here is the relevant part of the code:
paint = new Paint();
paint.setStyle(Style.STROKE);
paint.setStrokeWidth(20);
paint.setAntiAlias(true);
LinearGradient gradient = new LinearGradient(30, 0, 50, 0,
    new int[] {0x00000000, 0xFF0000FF, 0x00000000}, null, Shader.TileMode.MIRROR);
paint.setShader(gradient);
PathEffect cornerEffect = new CornerPathEffect(10);
paint.setPathEffect(cornerEffect);
canvas.drawPath(boxPath, paint);
Any ideas?
Another alternative is to get a 'soft-edged brush' effect when defining the stroke width. I've experimented with BlurMaskFilters, but those give a uniform blur rather than a transition from opaque to transparent. Does anyone know if that's possible?
如果你对这篇内容有疑问,欢迎到本站社区发帖提问 参与讨论,获取更多帮助,或者扫码二维码加入 Web 技术交流群。

绑定邮箱获取回复消息
由于您还没有绑定你的真实邮箱,如果其他用户或者作者回复了您的评论,将不能在第一时间通知您!

发布评论
评论(4)
用软笔刷位图绘制怎么样?使用 Photoshop 等图像编辑软件制作不透明度径向向外减小的柔软圆形画笔。保存为可绘制对象,将其加载到位图中,然后沿路径均匀地绘制它。用白色画笔制作位图。这样您就可以使用 PorterDuffColorFilter 将给定颜色(此处为蓝色)简单地乘以位图。
使用的画笔是(就在那里):

最终结果为:
How about drawing with a soft brush bitmap? Make a soft circular brush with opacity decreasing radially outward using image editing software like Photoshop. Save as drawable, load it in a bitmap and draw it evenly spaced along your path. Make the bitmap with white coloured brush. This way you can simply multiply the given colour(Here blue) to your bitmap using PorterDuffColorFilter.
The brush used is (It's there):

The final result is:
事实证明,有一种愚蠢而明显的方法可以做到这一点。只需重复使用相同的路径,并在每个绘图通道上调整描边宽度和 Alpha。示例代码:
请参阅下面的结果示例。左侧路径是使用此方法绘制的,为了进行比较,右侧路径是使用 maxWidth 和 255 alpha 在单笔划中绘制的。
这主要有效。有两个问题:
渐变并不像应有的那样平滑。这是因为每一次绘制都会覆盖前一次,导致 alpha 建立得太快,在最后一次绘制之前就达到 255。尝试一下 int alpha = (int) (i / numberOfPasses * 125f); 行(注意更改为 125f 而不是 255f)会有所帮助。
路径看起来像是在拐角内侧被“切割”的。可能是应用了
CornerPathEffect的一些结果。Turns out there was a stupidly obvious way of doing this. Simply re-use the same path, and adjust the stroke width and alpha on each drawing pass. Example code:
See below for an example of the result. The left path was drawn using this method, the right path, for comparison, is drawn in a single stroke with maxWidth and 255 alpha.
This mainly works. There are two problems:
The gradient isn't as smooth as it could be. This is because each pass being drawn over the previous one results in the alpha building up too quickly, reaching 255 before the final strokes. Experimenting a bit with the line
int alpha = (int) (i / numberOfPasses * 125f);(note the change to 125f rather than 255f) helps.The path looks like it has been 'cut' on the insides of the corners. Probably some result of the
CornerPathEffectapplied.如果我理解正确的话,你想要做的就是让渐变有效地形成笔划的“画笔”。
这正是我最近想要实现的目标,但据我所知,API 没有提供任何直接的方法来实现这一目标。我最近创建了一个 SVG 到 Android Canvas 转换器类,因此我最近也在 Inkscape 中进行了大量工作。所以,当我研究它时,我想知道是否可以在 Inkscape 中做到这一点。然而,即使在 Inkscape 中,这也是一件非常重要的事情。经过一番搜索,我最终发现了这张沿路径应用渐变的图像,以及下面教程的下载链接:
http://www.flickr.com/photos/35772571@N03/3312087295/
当时我个人想做的是创建一些半圆,其中路径是一种霓虹灯的光芒,而不是单一的颜色。就 Android API 和 SVG 标准而言,似乎唯一的方法就是创建一个完全以圆为中心的径向渐变,并将一系列颜色停止点放置在正确的位置。做起来相当棘手,我当然不知道如何制作像正方形这样的形状。
抱歉,这有点像“我也做不到”,而不是一个有用的答案!我将饶有兴趣地关注这一点,因为我也渴望知道一种“软刷”效果的解决方案。
What you're wanting to do, if I understand it right, is to have the gradient effectively form a "brush" for the stroke.
This is exactly what I also was trying to achieve recently, but as far as I can tell the API doesn't provide any straightforward means to do it. I have recently created an SVG to Android Canvas converter class and so I am working a lot in Inkscape lately, too. So, when I was looking into it, I wondered if it's even possible to do it in Inkscape. However, even in Inkscape it's a very non-trivial thing to do. After some searching I eventually came across this image of a gradient being applied along the course of a path, together with a download link for a tutorial beneath:
http://www.flickr.com/photos/35772571@N03/3312087295/
What I was personally trying to do at the time was to create some semi-circles where the path is a kind of neon glow as opposed to a flat colour. Talking in terms of both the Android API and the SVG standard, it seems that the only way to to do this is to create a radial gradient that's centred perfectly on the circle, and position a series of color stops in exactly the right places. Pretty tricky to do, and I certainly don't know how you'd do it to a shape like a square.
Sorry that this is a bit of a 'I couldn't do it either' rather than a useful answer! I'll follow this with interest as I'm eager to know a solution for a kind of 'soft brush' effect too.
绘制渐变比沿着路径绘制要复杂得多。
所以我建议你使用一些已经完成的库而不是为你制作它。
其中之一可以是 Sc-Gauges。
有一些有用的课程可以用来实现你的目标。
首先包含库:
在创建图像或您想要的画布后绘制:
现在是代码:
结果是:
代码的第一部分仅用于创建绘制的位图。
您感兴趣的是使用 ScCopier 的第二部分。
只需给出路径、颜色和符号即可。
请注意,您在视图内时可以使用
onDraw直接在视图画布上绘制。该库可用于创建各种类型的仪表。
如果您想看看这个网站 ScComponents 有一些免费的非仪表组件。
Can be very complicated to draw a gradient than follow a path.
So I suggest you to use some library already done than make it for you.
One can be Sc-Gauges.
Have some usefully classe than you can use for your goal.
For first include the library:
After create an image or what you want with a canvas where draw:
Now the code:
And this the result:
The first part of the code is just for create a bitmap where draw.
What you interest is the second part where use ScCopier.
Just give the path, the color and the with.
Note than is you are inside a view you can use
onDrawfor draw directly on the view canvas.This library can used to create gauge of every kind.
If you want take a look to this site ScComponents have some free and not gauges components.