使用 ImageKit & 将 NSOpenGLView 像素数据导出为某些图像文件格式时出现问题CG图像目的地

发布于 2024-09-02 11:58:12 字数 4027 浏览 0 评论 0 原文

摘要:将像素数据从 NSOpenGLView 导出到某些文件格式会给出不正确的颜色

我正在开发一个应用程序来可视化一些实验数据。它的功能之一是渲染 NSOpenGLView 子类中的数据,并允许将生成的图像导出到文件或复制到剪贴板。

视图将数据导出为 NSImage,生成如下:

- (NSImage*) image
{
    NSBitmapImageRep* imageRep;
    NSImage* image;
    NSSize viewSize = [self bounds].size;
    int width = viewSize.width;
    int height = viewSize.height;
    
    [self lockFocus];
    [self drawRect:[self bounds]];
    [self unlockFocus];
    
    imageRep=[[[NSBitmapImageRep alloc] initWithBitmapDataPlanes:NULL
                                                      pixelsWide:width
                                                      pixelsHigh:height
                                                   bitsPerSample:8
                                                 samplesPerPixel:4
                                                        hasAlpha:YES
                                                        isPlanar:NO
                                                  colorSpaceName:NSDeviceRGBColorSpace
                                                     bytesPerRow:width*4
                                                    bitsPerPixel:32] autorelease];
    [[self openGLContext] makeCurrentContext];
    glReadPixels(0,0,width,height,GL_RGBA,GL_UNSIGNED_BYTE,[imageRep bitmapData]);
    image=[[[NSImage alloc] initWithSize:NSMakeSize(width,height)] autorelease];
    [image addRepresentation:imageRep];
    [image setFlipped:YES]; // this is deprecated in 10.6
    [image lockFocusOnRepresentation:imageRep]; // this will flip the rep
    [image unlockFocus];
    return image;
}

复制使用此图像非常简单,如下所示:

- (IBAction) copy:(id) sender
{
    NSImage* img = [self image];
    NSPasteboard* pb = [NSPasteboard generalPasteboard];
    [pb clearContents];
    NSArray* copied = [NSArray arrayWithObject:img];
    [pb writeObjects:copied];
}

对于文件写入,我使用 ImageKit IKSaveOptions 附件面板来设置输出文件类型和相关选项,然后使用以下代码进行写入:(

NSImage* glImage = [glView image];
NSRect rect = [glView bounds];
rect.origin.x = rect.origin.y = 0;
img = [glImage CGImageForProposedRect:&rect
                              context:[NSGraphicsContext currentContext]
                                hints:nil];

if (img)
{
    NSURL* url = [NSURL fileURLWithPath: path];
    CGImageDestinationRef dest = CGImageDestinationCreateWithURL((CFURLRef)url,
                                                                 (CFStringRef)newUTType,
                                                                 1,
                                                                 NULL);
    if (dest)
    {
        CGImageDestinationAddImage(dest,
                                   img,
                                   (CFDictionaryRef)[imgSaveOptions imageProperties]);
        CGImageDestinationFinalize(dest);
        CFRelease(dest);
    }
}

我在这里删除了一些无关的代码,但据我所知,没有什么会影响结果。 newUTType< /code> 来自 IKSaveOptions 面板。)

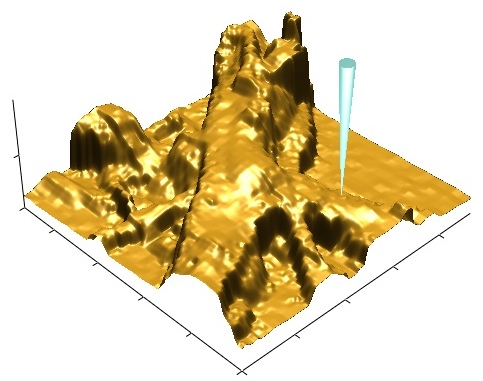
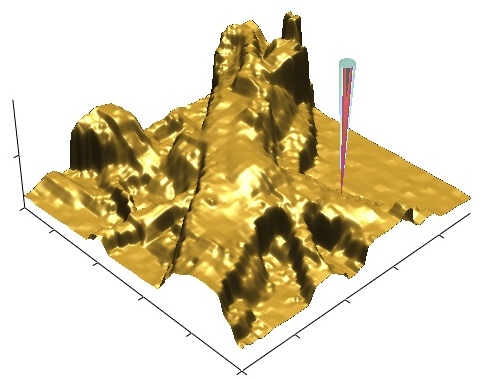
当文件导出为 GIF、JPEG、PNG、PSD 或 TIFF 时效果很好,但导出为 PDF、BMP、TGA、ICNS 和 JPEG-2000 时效果很好在图像的一部分上产生红色伪影。示例图像如下,第一个导出为 JPG,第二个导出为 PDF。

图像已导出作为 JPEG,颜色正确
(来源:walkytalky.net

导出为 PDF 的图像,带有移液器上有红色条带
(来源:walkytalky.net

复制到剪贴板确实使用 image 的当前实现不会显示此红色条纹,但使用 NSCalibrateRGBColorSpace 生成 imageRep 的原始实现确实 而不是 NSDeviceRGBColorSpace。所以我猜测从 OpenGL 获得的像素颜色表示存在一些问题,无法正确完成后续转换,但我不知道该怎么办。

那么,谁能告诉我(i)是什么原因造成的,以及(ii)我怎样才能让它消失?我不太关心所有格式,但我真的至少希望 PDF 可以工作。

Summary: exporting pixel data from NSOpenGLView to some file formats gives incorrect colours

I am developing an application to visualise some experimental data. One of its functions is to render the data in an NSOpenGLView subclass, and allow the resulting image to be exported to a file or copied to the clipboard.

The view exports the data as an NSImage, generated like this:

- (NSImage*) image
{
    NSBitmapImageRep* imageRep;
    NSImage* image;
    NSSize viewSize = [self bounds].size;
    int width = viewSize.width;
    int height = viewSize.height;
    
    [self lockFocus];
    [self drawRect:[self bounds]];
    [self unlockFocus];
    
    imageRep=[[[NSBitmapImageRep alloc] initWithBitmapDataPlanes:NULL
                                                      pixelsWide:width
                                                      pixelsHigh:height
                                                   bitsPerSample:8
                                                 samplesPerPixel:4
                                                        hasAlpha:YES
                                                        isPlanar:NO
                                                  colorSpaceName:NSDeviceRGBColorSpace
                                                     bytesPerRow:width*4
                                                    bitsPerPixel:32] autorelease];
    [[self openGLContext] makeCurrentContext];
    glReadPixels(0,0,width,height,GL_RGBA,GL_UNSIGNED_BYTE,[imageRep bitmapData]);
    image=[[[NSImage alloc] initWithSize:NSMakeSize(width,height)] autorelease];
    [image addRepresentation:imageRep];
    [image setFlipped:YES]; // this is deprecated in 10.6
    [image lockFocusOnRepresentation:imageRep]; // this will flip the rep
    [image unlockFocus];
    return image;
}

Copying uses this image very simply, like this:

- (IBAction) copy:(id) sender
{
    NSImage* img = [self image];
    NSPasteboard* pb = [NSPasteboard generalPasteboard];
    [pb clearContents];
    NSArray* copied = [NSArray arrayWithObject:img];
    [pb writeObjects:copied];
}

For file writing, I use the ImageKit IKSaveOptions accessory panel to set the output file type and associated options, then use the following code to do the writing:

NSImage* glImage = [glView image];
NSRect rect = [glView bounds];
rect.origin.x = rect.origin.y = 0;
img = [glImage CGImageForProposedRect:&rect
                              context:[NSGraphicsContext currentContext]
                                hints:nil];

if (img)
{
    NSURL* url = [NSURL fileURLWithPath: path];
    CGImageDestinationRef dest = CGImageDestinationCreateWithURL((CFURLRef)url,
                                                                 (CFStringRef)newUTType,
                                                                 1,
                                                                 NULL);
    if (dest)
    {
        CGImageDestinationAddImage(dest,
                                   img,
                                   (CFDictionaryRef)[imgSaveOptions imageProperties]);
        CGImageDestinationFinalize(dest);
        CFRelease(dest);
    }
}

(I've trimmed a bit of extraneous code here, but nothing that would affect the outcome as far as I can see. The newUTType comes from the IKSaveOptions panel.)

This works fine when the file is exported as GIF, JPEG, PNG, PSD or TIFF, but exporting to PDF, BMP, TGA, ICNS and JPEG-2000 produces a red colour artefact on part of the image. Example images are below, the first exported as JPG, the second as PDF.

Image exported as JPEG, with colours correct
(source: walkytalky.net)

Image exported as PDF, with red banding on pipette
(source: walkytalky.net)

Copy to clipboard does not exhibit this red stripe with the current implementation of image, but it did with the original implementation, which generated the imageRep using NSCalibratedRGBColorSpace rather than NSDeviceRGBColorSpace. So I'm guessing there's some issue with the colour representation in the pixels I get from OpenGL that doesn't get through the subsequent conversions properly, but I'm at a loss as to what to do about it.

So, can anyone tell me (i) what is causing this, and (ii) how can I make it go away? I don't care so much about all of the formats but I'd really like at least PDF to work.

如果你对这篇内容有疑问,欢迎到本站社区发帖提问 参与讨论,获取更多帮助,或者扫码二维码加入 Web 技术交流群。

扫码二维码加入Web技术交流群

发布评论

需要 登录 才能够评论, 你可以免费 注册 一个本站的账号。

评论(1

梦冥 2024-09-09 11:58:12

好的。正如这个问题引起的震耳欲聋的沉默所证明的那样,这个问题有点晦涩难懂。但解决方法很好而且简单,所以我在这里描述它以防有人想知道。

摘要:某些文件导出格式不能很好地处理渲染像素中的半透明度。

我不明白其确切原因,尽管它可能与 alpha 的存在或不存在有关预乘法。所有格式似乎都可以使用完全透明的像素,如果格式不支持透明度,则将它们渲染为透明或白色。但是具有部分 Alpha 的像素以及颜色通道中的某些内容可能会被破坏。

碰巧的是,我什至不希望图像的任何部分是半透明的,并且确实在相关渲染代码之前设置了glDisable(GL_BLEND)。但是,对象是使用OpenGL 主站点上看似规范的集合,其中一些在镜面反射、漫反射和环境颜色中包含 1.0 以外的 alpha 值。我盲目地复制了这个,没有注意到它可能会导致一些不需要的半透明。

就我的目的而言,解决方案很简单:更改材质定义,使 alpha 分量始终为 1.0

请注意,某些图像格式(例如 PNG 和 TIFF)完全完全支持半透明,因此如果您需要,那么就可以选择这些格式。

事实上,这就是让我得到答案的原因。然而,一开始并不明显,因为我使用 OS X Preview 来查看文件,并且使用默认视图设置时半透明度并不明显:

导出到 BMP 的半透明移液器
(来源:walkytalky.net

导出为 PNG 的半透明移液器预览中的 JPG
(来源:walkytalky.net

导出为 PNG 的半透明移液器,在预览中查看
(来源:walkytalky.net

半透明移液器导出为 PNG,查看在 Photoshop 中></a><br />
<sub>(来源:<a href=walkytalky.net

所以,第二个整个事件的教训是:启用查看|在预览中显示图像背景以获取棋盘并显示任何杂散透明度。

OK. As evidenced by the deafening silence which met this question, the problem turns out to be a bit obscure. But the workaround is nice and simple, so I'm describing it here just in case anyone ever wants to know.

Summary: some file export formats do not cope well with translucency in the rendered pixels.

I don't understand the exact reasons for this, although it might possibly have something to do with the presence or absence of alpha pre-multiplication. All the formats seem to be fine with completely transparent pixels, rendering them either transparent or as white if the format doesn't support transparency. But pixels that have a partial alpha, plus something in the colour channels, may get mangled.

As it happens, I did not even want any parts of the image to be translucent, and indeed set glDisable(GL_BLEND) before the relevant rendering code. However, objects were rendered with the materials from this seemingly-canonical collection at the OpenGL home site, some of which include alpha values other than 1.0 in their specular, diffuse and ambient colours. I had slavishly copied this without paying attention to that fact that it might lead to some unwanted translucency.

For my purposes, then, the solution is straightforward: change the material definitions so that the alpha component is always 1.0.

Note that some image formats, such as PNG and TIFF, do fully support the translucency, so if you need that then those are the ones to go for.

This was, in fact what tipped me off to the answer. However it was not obvious at first because I was using OS X Preview to view the files, and the translucency is not obvious with the default view settings:

translucent pipette as exported to BMP
(source: walkytalky.net)

translucent pipette as exported to PNG and thence JPG in Preview
(source: walkytalky.net)

translucent pipette as exported to PNG, viewed in Preview
(source: walkytalky.net)

translucent pipette as exported to PNG, viewed in Photoshop
(source: walkytalky.net)

So, a second lesson from this whole episode is: enable View | Show Image Background in Preview to get the checkerboard and show up any stray transparency.

~没有更多了~
我们使用 Cookies 和其他技术来定制您的体验包括您的登录状态等。通过阅读我们的 隐私政策 了解更多相关信息。 单击 接受 或继续使用网站,即表示您同意使用 Cookies 和您的相关数据。
原文