如何补偿打印页面照片中的不均匀照明?
我正在尝试教我的相机成为扫描仪:我拍摄打印文本的照片,然后将它们转换为位图(然后转换为 djvu 和 OCR 编辑)。我需要计算一个阈值,哪些像素应该是白色的,哪些像素应该是黑色的,但我因照明不均匀而受阻。例如,如果中心的像素足够暗,我很可能会在角落里看到一堆黑色像素。
在相对简单的假设下,我想做的是在阈值化之前补偿不均匀的照明。更准确地说:
假设一个或两个光源,可能一个光源的表面光强度逐渐变化(环境光),另一个光源的光强度呈平方反比(直接光)。
假设纸张的白色部分都具有相同的反射率/反照率/其他。
找到一些算法来估计每个像素的光照度,并从中恢复每个像素的反射率。
根据像素的反射率,将其分类为白色或黑色
我不知道如何编写算法来执行此操作。我不想依靠最小二乘拟合,因为在估计照明时我想忽略暗像素。我也不知道这个算法是否有效。
所有有用的建议都会被点赞!
编辑:我绝对考虑过将图像切成足够大的块,这样它们仍然看起来像“白色背景上的文本”,但又足够小,以便单个块的照明或多或少均匀。我想,如果我对阈值进行插值,这样子图像边界上就不会出现不连续性,我可能会得到一些不错的东西。这是一个很好的建议,我将不得不尝试一下,但它仍然给我留下了如何在白色和黑色之间划清界限的问题。更多想法?
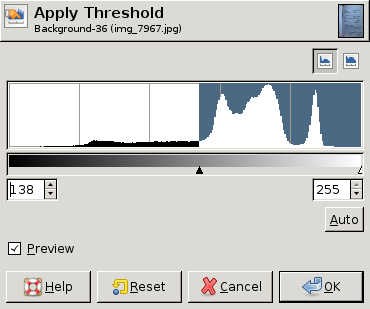
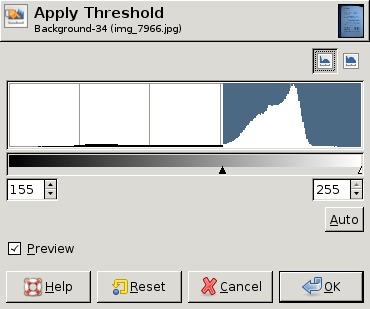
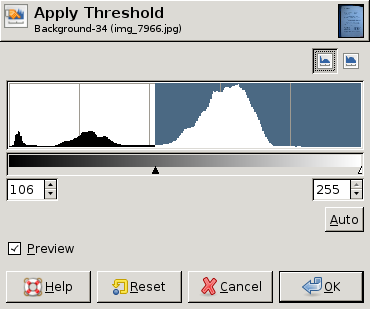
编辑:以下是 GIMP 的一些屏幕转储,显示了不同的直方图以及每个直方图的“最佳”阈值(手动选择)。在这三个中的两个中,整个图像的单个阈值就足够了。然而,在第三个中,左上角确实需要不同的阈值:


I am trying to teach my camera to be a scanner: I take pictures of printed text and then convert them to bitmaps (and then to djvu and OCR'ed). I need to compute a threshold for which pixels should be white and which black, but I'm stymied by uneven illumination. For example if the pixels in the center are dark enough, I'm likely to wind up with a bunch of black pixels in the corners.
What I would like to do, under relatively simple assumptions, is compensate for uneven illumination before thresholding. More precisely:
Assume one or two light sources, maybe one with gradual change in light intensity across the surface (ambient light) and another with an inverse square (direct light).
Assume that the white parts of the paper all have the same reflectivity/albedo/whatever.
Find some algorithm to estimate degree of illumination at each pixel, and from that recover the reflectivity of each pixel.
From a pixel's reflectivity, classify it white or black
I have no idea how to write an algorithm to do this. I don't want to fall back on least-squares fitting since I'd somehow like to ignore the dark pixels when estimating illumination. I also don't know if the algorithm will work.
All helpful advice will be upvoted!
EDIT: I've definitely considered chopping the image into pieces that are large enough so they still look like "text on a white background" but small enough so that illumination of a single piece is more or less even. I think if I then interpolate the thresholds so that there's no discontinuity across sub-image boundaries, I will probably get something halfway decent. This is a good suggestion, and I will have to give it a try, but it still leaves me with the problem of where to draw the line between white and black. More thoughts?
EDIT: Here are some screen dumps from GIMP showing different histograms and the "best" threshold value (chosen by hand) for each histogram. In two of the three a single threshold for the whole image is good enough. In the third, however, the upper left corner really needs a different threshold:


如果你对这篇内容有疑问,欢迎到本站社区发帖提问 参与讨论,获取更多帮助,或者扫码二维码加入 Web 技术交流群。

绑定邮箱获取回复消息
由于您还没有绑定你的真实邮箱,如果其他用户或者作者回复了您的评论,将不能在第一时间通知您!

发布评论
评论(10)
我不确定这么长时间后您是否仍然需要解决方案,但如果您仍然需要。几年前,我和我的团队用相机拍摄了大约 250,000 页,并将它们转换为(几乎黑白)灰度图像,然后我们对其进行 DjVued(也制作 pdf)。
(参见法国本地治里研究所 1144 份纸质成绩单的目录和完整摄影传真集< /a>.)
我们还遇到了光照不均匀的问题。我们提出了一个简单、不复杂的解决方案,在实践中效果非常好。该解决方案还应该能够创建黑白图像而不是灰度图像(正如我将描述的)。
相机和灯光设置
a) 我们将一个空相框粘贴到桌子顶部,以使页面保持完全相同的位置。
b)我们将相机放在三脚架上,也放在上面的桌子上,并向下指向粘贴的相框,并将相机放在一个大约一英尺宽的杆上,该杆连接到相机顶部的外部闪光灯支架上,我们在相机上安装了两个“造型灯”。这些可以在任何好的相机店购买。它们旨在提供均匀的照明。通过在每个造型灯周围放置小纸板箱来遮挡相机的灯光。我们以灰度拍摄,然后进一步处理。 (我们的页面是用蓝色墨水书写的旧棕色纸,因此您的情况应该更简单)。
图像处理
我们使用免费软件包irfanview。
该软件具有批处理模式,可以同时进行色彩校正、更改位深度和裁剪图像。我们会拍摄页面的照片,然后在交互模式下调整亮度、对比度和伽玛设置,直到接近黑白。 (我们使用灰度,但通过将位深度设置为 2,当批处理所有页面时,您将得到黑色和白色。)
确定最佳色彩校正后,我们以交互方式裁剪单个图像并记下裁剪设置。然后,我们在批处理模式窗口中设置所有这些设置并处理一本书的页面。
创建 DjVu 图像。
我们使用免费的 DjVu Solo 3.1 来创建 DjVu 图像。它有多种模式来创建 DjVu 图像。创建黑白图像的模式不适合我们拍摄照片,但“照片”模式却可以。
我们没有进行 OCR(因为图像是手写的梵文),但只要字母均匀照亮,我认为您的 OCR 软件应该忽略大的黑色区域,例如两页之间的黑色区域。但是,您始终可以通过将页面裁剪两次来消除两页跨页之间或边缘处的黑色,一次为左侧页面,一次为右侧页面,irfanview 软件将允许您巧妙地对页面进行编号,以便您然后可以按正确的顺序重新合并页面。即,将您的页面重命名为左侧页面的 page-xxxA 和右侧页面的 page-xxxB,然后页面将根据名称正确排序。
如果您仍然需要解决方案,我希望上述内容对您有用。
I'm not sure if you still need a solution after all this time, but if you still do. A few years ago I and my team photographed about 250,000 pages with a camera and converted them to (almost black and white ) grey scale images which we then DjVued ( also make pdfs of).
(See The catalogue and complete collection of photographic facsimiles of the 1144 paper transcripts of the French Institute of Pondicherry.)
We also ran into the problem of uneven illumination. We came up with a simple unsophisticated solution which worked very well in practice. This solution should also work to create black and white images rather than grey scale (as I'll describe).
The camera and lighting setup
a) We taped an empty picture frame to the top of a table to keep our pages in the exact same position.
b) We put a camera on a tripod also on top of the table above and pointing down at the taped picture frame and on a bar about a foot wide attached to the external flash holder on top of the camera we attached two "modelling lights". These can be purchased at any good camera shop. They are designed to provide even illumination. The camera was shaded from the lights by putting small cardboard box around each modelling light. We photographed in greyscale which we then further processed. (Our pages were old browned paper with blue ink writing so your case should be simpler).
Processing of the images
We used the free software package irfanview.
This software has a batch mode which can simultaneously do color correction, change the bit depth and crop the images. We would take the photograph of a page and then in interactive mode adjust the brightness, contrast and gamma settings till it was close to black and white. (We used greyscale but by setting the bit depth to 2 you will get black and white when you batch process all the pages.)
After determining the best color correction we then interactively cropped a single image and noted the cropping settings. We then set all these settings in the batch mode window and processed the pages for one book.
Creating DjVu images.
We used the free DjVu Solo 3.1 to create the DjVu images. This has several modes to create the DjVu images. The mode which creates black and white images didn't work well for us for photographs, but the "photo" mode did.
We didn't OCR (since the images were handwritten Sanskrit) but as long as the letters are evenly illuminated I think your OCR software should ignore big black areas like between a two page spread. But you can always get rid of the black between a two page spread or at the edges by cropping the pages twices once for the left hand pages and once for the right hand pages and the irfanview software will allow you to cleverly number your pages so you can then remerge the pages in the correct order. I.e rename your pages something like page-xxxA for lefthand pages and page-xxxB for righthand pages and the pages will then sort correctly on name.
If you still need a solution I hope some of the above is useful to you.
我建议校准相机。考虑到您的照明设置是固定的(即灯光在图片之间不会移动),并且您的相机是灰度(不是彩色)。
拍摄一张覆盖“扫描仪”整个可用区域的白纸的照片。存储这张图片,它告诉每个像素是什么是白纸。现在,当您拍摄要扫描的文档的照片时,您可以在执行阈值之前重新加载“白色参考图片”甚至照明。
我们称白色参考为REF,图片为DOC,均匀照明图片为EVEN,像素最大值为MAX(对于8bit成像,为255)。对于每个像素:
注意:
i would recommend calibrating the camera. considering that your lighting setup is fixed (that is the lights do not move between pictures), and your camera is grayscale (not color).
take a picture of a white sheet of paper which covers the whole workable area of your "scanner". store this picture, it tells what is white paper for each pixel. now, when you take take a picture of a document to scan, you can reload your "white reference picture" and even the illumination before performing a threshold.
let's call the white reference REF, the picture DOC, the even illumination picture EVEN, and the maximum value of a pixel MAX (for 8bit imaging, it is 255). for each pixel:
notes:
自适应阈值是关键字。引自 R. 2003 年文章。
Fisher、S. Perkins、A. Walker 和 E. Wolfart:“这个更复杂的版本
阈值化可以适应图像中不断变化的照明条件,例如
这些是由于强烈的照明梯度或阴影而发生的。”
ImageMagick 的 -lat 选项可以做到这一点,例如:
input.jpg输出.jpgAdaptive thresholding is the keyword. Quote from a 2003 article by R.
Fisher, S. Perkins, A. Walker, and E. Wolfart: “This more sophisticated version
of thresholding can accommodate changing lighting conditions in the image, e.g.
those occurring as a result of a strong illumination gradient or shadows.”
ImageMagick's -lat option can do it, for example:
input.jpgoutput.jpg出色地。通常,我所做的图像处理对时间高度敏感,因此像您正在寻找的复杂算法是行不通的。但 。 。 。您是否考虑过将图像切成小块,然后重新缩放每个子图像?即使在可变照明条件的图像中,这也应该使“暗”像素相当突出(我假设您正在谈论带有暗文本的标准大部分白色页面。)
这是一个作弊,但比您建议的“正确”方式。
Well. Usually the image processing I do is highly time sensitive, so a complex algorithm like the one you're seeking wouldn't work. But . . . have you considered chopping the image up into smaller pieces, and re-scaling each sub-image? That should make the 'dark' pixels stand out fairly well even in an image of variable lighting conditions (I am assuming here that you are talking about a standard mostly-white page with dark text.)
Its a cheat, but a lot easier than the 'right' way you're suggesting.
这可能会非常慢,但我建议是将扫描表面分成四分之一/十六分之一并重新着色,以便整个页面的平均灰度级别相似。 (如果您的页面边距较大,则可能会损坏)
This might be horrendously slow, but what I'd recommend is to break the scanned surface into quarters/16ths and re-color them so that the average grayscale level is similar across the page. (Might break if you have pages with large margins though)
我假设您正在拍摄白色背景上(相对)小的黑色字母的图像。
一种方法可能是“移除”小的黑色物体,同时保持背景的照明变化。这给出了图像照明方式的估计,可用于标准化原始图像。从原始图像中减去照明估计,然后进行基于阈值的分割通常就足够了。
这种方法基于灰度形态过滤器,可以在 matlab 中实现,如下所示:
有关真实图像的示例,请查看 mathworks。要进一步阅读有关形态学图像分析的使用Pierre Soille 撰写的这本书,可以被推荐。
I assume that you are taking images of (relatively) small black letters on a white background.
One approach could be to "remove" the small black objects, while keeping the illumination variations of the background. This gives an estimate of how the image is illuminated, which can be used for normalizing the original image. It is often enough to subtract the illumination estimate from the original image and then do a threshold based segmentation.
This approach is based on gray scale morphological filters, and could be implemented in matlab like below:
For an example with real images take a look at this guide from mathworks. For further reading about the use of morphological image analysis this book by Pierre Soille can be recommended.
我想到了两种算法:
Two algorithms come to my mind:
您可以尝试使用边缘检测过滤器,然后使用洪水填充算法来区分背景和前景。对泛光区域进行插值以确定局部照明;您还可以修改洪水填充算法以使用本地背景值来跳过线和填充框等等。
You could try using an edge detection filter, then a floodfill algorithm, to distinguish the background from the foreground. Interpolate the floodfilled region to determine the local illumination; you may also be able to modify the floodfill algorithm to use the local background value to jump across lines and fill boxes and so forth.
您还可以尝试使用变化率控制的阈值滞后。以下是正常阈值迟滞的链接。将第一个阈值设置为典型的白色值。将第二个阈值设置为小于角落的最低白色值。
不同之处在于您想要检查第一个阈值和第二个阈值之间的所有值的像素之间的差异。理想情况下,如果差异为正,则正常行事。但如果是负数,则只需在差异很小时设置阈值。
这将能够补偿光照变化,但会忽略背景和文本之间的巨大变化。
You could also try a Threshold Hysteresis with a rate of change control. Here is the link to the normal Threshold Hysteresis. Set the first threshold to a typical white value. Set the second threshold to less than the lowest white value in the corners.
The difference is that you want to check the difference between pixels for all values in between the first and second threshold. Ideally if the difference is positive, then act normally. But if it is negative, you only want to threshold if the difference is small.
This will be able to compensate for lighting variations, but will ignore the large changes between the background and the text.
为什么不使用简单的打开和关闭操作呢?
尝试一下,看看结果:
src - 源图像
src - 打开(src)
close(src) - src
并查看 close - src 结果
使用不同的窗口大小,您将获得图像的背景。
我认为这有帮助。
Why don't you use simple opening and closing operations?
Try this, just lool at the results:
src - cource image
src - open(src)
close(src) - src
and look at the close - src result
using different window size, you will get backgound of the image.
I think this helps.