推送 UIView 时隐藏 UITabBar

发布于 2024-07-16 11:02:57 字数 362 浏览 10 评论 0原文

我有一个 UITabBarController ,其中默认视图控制器是 UINavigationController 。 当我在 UINavigationController 中推送某个视图时,我希望能够隐藏 UITabBarController 的 UITabBar。

我尝试

delegate.tabBarController.hidesBottomBarWhenPushed = YES;

在推送视图之前在 UINavigationController 中添加:,但这似乎不起作用。

关于我应该做什么或者是否可能的任何提示? 提前致谢!

I have a UITabBarController where the default view controller is a UINavigationController. I want to be able to hide the UITabBar of the UITabBarController when I push a certain view in the UINavigationController.

I've tried adding:

delegate.tabBarController.hidesBottomBarWhenPushed = YES;

in my UINavigationController before I push the view, but that doesn't seem to do the trick.

Any tips on what I should be doing or if it's even possible? Thanks in advance!

如果你对这篇内容有疑问,欢迎到本站社区发帖提问 参与讨论,获取更多帮助,或者扫码二维码加入 Web 技术交流群。

扫码二维码加入Web技术交流群

发布评论

需要 登录 才能够评论, 你可以免费 注册 一个本站的账号。

评论(9

独﹏钓一江月 2024-07-23 11:02:57

这更好:

viewController.hidesBottomBarWhenPushed = YES;
[self.navigationController pushViewController:viewController animated:YES];

您必须在要推入视图的控制器上设置 hidesBottomBarWhenPushed = YES...

This is better:

viewController.hidesBottomBarWhenPushed = YES;
[self.navigationController pushViewController:viewController animated:YES];

You have to set hidesBottomBarWhenPushed = YES on the controller you are going to push into the view...

情感失落者 2024-07-23 11:02:57

使用故事板时,可以轻松设置视图控制器,该控制器将在推送时隐藏选项卡栏,在目标视图控制器上只需选择此复选框:
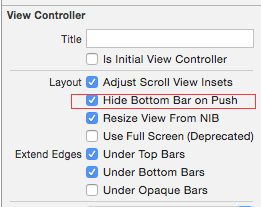
在此处输入图像描述

when working with storyboard its easy to setup view controller which will hide the tabbar on push, on the destination view controller just select this checkbox:
enter image description here

眼趣 2024-07-23 11:02:57

我已经弄清楚如何解决这个问题,我遇到了同样的问题,但苹果还告诉我们如何在名为“The Elements”的示例中做到这一点(http://developer.apple.com/library/ios/#samplecode/TheElements/Introduction/Intro.html)

请参阅下面的函数了解如何执行此操作,将其添加到要推入的视图的 init 函数中!

-(id) init { 
    if(self = [super init]) { 
        self.hidesBottomBarWhenPushed = YES; 
    } 
    return self; 
}

它将自动隐藏选项卡栏,就像 iPhone 上的照片应用程序一样。 当您向后导航时,父视图将再次显示选项卡栏。

祝你好运

I've figure out how to get this solved, I was running into the same issue, but Apple also tells us how to do it in the sample called: "The Elements" (http://developer.apple.com/library/ios/#samplecode/TheElements/Introduction/Intro.html)

See function below on how to do it, add this to the init function of the view you want to push in!

-(id) init { 
    if(self = [super init]) { 
        self.hidesBottomBarWhenPushed = YES; 
    } 
    return self; 
}

It will automatically hide the tabbar like the photo app does on your iphone. And when you navigate back the parent view will just show the tabbar again.

Good luck

帅冕 2024-07-23 11:02:57

我已经尝试了大多数建议的解决方案。 最后他们都没有为我工作。

hideTabBarWhenPushed 不仅为下一个推送的视图控制器隐藏标签栏,而且为所有推送的视图控制器隐藏标签栏。 对于那些我确实希望标签栏控制器重新出现的人。

Orafaelreis 的解决方案(见上文)似乎最适合这一点。 但他的尝试只适用于严格的纵向方向,甚至颠倒方向也无效。 所以我不得不去修补它。 这就是我最终得到的:

#define kTabBarHeight               49 // This may be different on retina screens. Frankly, I have not yet tried.

- (void) hideTabBar:(BOOL)hide {

    // fetch the app delegate
    AppDelegate         *delegate   = [[UIApplication sharedApplication] delegate];

    // get the device coordinates
    CGRect              bounds      = [UIScreen mainScreen].bounds;
    float               width;
    float               height;

    // Apparently the tab bar controller's view works with device coordinates  
    // and not with normal view/sub view coordinates
    // Therefore the following statement works for all orientations. 
    width                   = bounds.size.width;
    height                  = bounds.size.height;

    if (hide) {

        // The tab bar should be hidden too. 
        // Otherwise it may flickr up a moment upon rotation or 
        // upon return from detail view controllers. 
        [self.tabBarController.tabBar setHidden:YES];

        // Hiding alone is not sufficient. Hiding alone would leave us with an unusable black
        // bar on the bottom of the size of the tab bar. 
        // We need to enlarge the tab bar controller's view by the height of the tab bar. 
        // Doing so the tab bar, although hidden, appears just beneath the screen. 
        // As the tab bar controller's view works in device coordinations, we need to enlarge 
        // it by the tab bar height in the appropriate direction (height in portrait and width in landscape)
        // and in reverse/upside down orientation we need to shift the area's origin beyond zero. 
        switch (delegate.tabBarController.interfaceOrientation) {
            case UIInterfaceOrientationPortrait:
                // Easy going. Just add the space on the bottom.
                [self.tabBarController.view setFrame:CGRectMake(0,0,width,height+kTabBarHeight)];
                break;

            case UIInterfaceOrientationPortraitUpsideDown:
                // The bottom is now up! Add the appropriate space and shift the rect's origin to y = -49
                [self.tabBarController.view setFrame:CGRectMake(0,-kTabBarHeight,width,height+kTabBarHeight)];
                break;

            case UIInterfaceOrientationLandscapeLeft:
                // Same as Portrait but add the space to the with but the height
                [self.tabBarController.view setFrame:CGRectMake(0,0,width+kTabBarHeight,height)];
                break;

            case UIInterfaceOrientationLandscapeRight:
                // Similar to Upside Down: Add the space and shift the rect. Just use x and with this time
                [self.tabBarController.view setFrame:CGRectMake(0-kTabBarHeight,0,width+kTabBarHeight,height)];
                break;

            default:
                break;
        }
    } else {
        // reset everything to its original state. 
        [self.tabBarController.view setFrame:CGRectMake(0,0,width,height)];
        [self.tabBarController.tabBar setHidden:NO];
    }

    return; 
}


- (void)didRotateFromInterfaceOrientation:(UIInterfaceOrientation)fromInterfaceOrientation{

    // It is important to call this method at all and to call it here and not in willRotateToInterfaceOrientation
    // Otherwise the tab bar will re-appear. 
    [self hideTabBar:YES];

    // You may want to re-arrange any other views according to the new orientation
    // You could, of course, utilize willRotateToInterfaceOrientation instead for your subViews. 
}

- (void)viewWillAppear: (BOOL)animated { 

    // In my app I want to hide the status bar and navigation bar too. 
    // You may not want to do that. If so then skip the next two lines. 
    self.navigationController.navigationBar.barStyle = UIBarStyleBlackTranslucent;
    [[UIApplication sharedApplication] setStatusBarHidden:YES withAnimation:UIStatusBarAnimationSlide];

    [self hideTabBar: YES];

    // You may want to re-arrange your subviews here. 
    // Orientation may have changed while detail view controllers were visible. 
    // This method is called upon return from pushed and pulled view controllers.   

    return;
}

- (void)viewWillDisappear: (BOOL)animated {     

    // This method is called while this view controller is pulled
    // or when a sub view controller is pushed and becomes visible
    // Therefore the original settings for the tab bar, navigation bar and status bar need to be re-instated

    [self hideTabBar:NO];

    // If you did not change the appearance of the navigation and status bar in viewWillAppear,
    // then you can skip the next two statements too. 
    self.navigationController.navigationBar.barStyle = UIBarStyleBlack;
    [[UIApplication sharedApplication] setStatusBarHidden:NO withAnimation:UIStatusBarAnimationSlide];

    return;
}

内嵌注释应该解释每个语句的推理。 不过,可能有更聪明的编码方法。

隐藏状态栏和导航栏也会带来一个副作用,我不想向你们隐藏这一点。
1. 当从该导航控制器返回到调用导航控制器时,调用控制器上的状态栏和导航栏会重叠,直到设备旋转一次或直到另一个选项卡出现在前面后再次选择相关选项卡。
2. 当调用视图控制器是表格视图并且设备在返回表格时处于横向模式时,表格将以适合横向的方向显示,但其布局就像纵向一样。 左上角很好,但一些表格单元格和选项卡栏隐藏在屏幕下方。 右侧有一些可用空间。 这也可以通过再次旋转设备来解决。

一旦我找到这些小但令人讨厌的错误的解决方案,我会及时通知您。

I have tried most of the suggested solutions. In the end none of them worked for me.

hideTabBarWhenPushed hides the tab bar not only for the view controller that is pushed next but for all view controllers that are pushed within. For those I did want the tab bar controller to re-appear.

Orafaelreis' solution (see above) seemed to suite that most. But his attempt only worked for strict portrait orientations, not even for upside down. So I had to mend it. This is what I finally got:

#define kTabBarHeight               49 // This may be different on retina screens. Frankly, I have not yet tried.

- (void) hideTabBar:(BOOL)hide {

    // fetch the app delegate
    AppDelegate         *delegate   = [[UIApplication sharedApplication] delegate];

    // get the device coordinates
    CGRect              bounds      = [UIScreen mainScreen].bounds;
    float               width;
    float               height;

    // Apparently the tab bar controller's view works with device coordinates  
    // and not with normal view/sub view coordinates
    // Therefore the following statement works for all orientations. 
    width                   = bounds.size.width;
    height                  = bounds.size.height;

    if (hide) {

        // The tab bar should be hidden too. 
        // Otherwise it may flickr up a moment upon rotation or 
        // upon return from detail view controllers. 
        [self.tabBarController.tabBar setHidden:YES];

        // Hiding alone is not sufficient. Hiding alone would leave us with an unusable black
        // bar on the bottom of the size of the tab bar. 
        // We need to enlarge the tab bar controller's view by the height of the tab bar. 
        // Doing so the tab bar, although hidden, appears just beneath the screen. 
        // As the tab bar controller's view works in device coordinations, we need to enlarge 
        // it by the tab bar height in the appropriate direction (height in portrait and width in landscape)
        // and in reverse/upside down orientation we need to shift the area's origin beyond zero. 
        switch (delegate.tabBarController.interfaceOrientation) {
            case UIInterfaceOrientationPortrait:
                // Easy going. Just add the space on the bottom.
                [self.tabBarController.view setFrame:CGRectMake(0,0,width,height+kTabBarHeight)];
                break;

            case UIInterfaceOrientationPortraitUpsideDown:
                // The bottom is now up! Add the appropriate space and shift the rect's origin to y = -49
                [self.tabBarController.view setFrame:CGRectMake(0,-kTabBarHeight,width,height+kTabBarHeight)];
                break;

            case UIInterfaceOrientationLandscapeLeft:
                // Same as Portrait but add the space to the with but the height
                [self.tabBarController.view setFrame:CGRectMake(0,0,width+kTabBarHeight,height)];
                break;

            case UIInterfaceOrientationLandscapeRight:
                // Similar to Upside Down: Add the space and shift the rect. Just use x and with this time
                [self.tabBarController.view setFrame:CGRectMake(0-kTabBarHeight,0,width+kTabBarHeight,height)];
                break;

            default:
                break;
        }
    } else {
        // reset everything to its original state. 
        [self.tabBarController.view setFrame:CGRectMake(0,0,width,height)];
        [self.tabBarController.tabBar setHidden:NO];
    }

    return; 
}


- (void)didRotateFromInterfaceOrientation:(UIInterfaceOrientation)fromInterfaceOrientation{

    // It is important to call this method at all and to call it here and not in willRotateToInterfaceOrientation
    // Otherwise the tab bar will re-appear. 
    [self hideTabBar:YES];

    // You may want to re-arrange any other views according to the new orientation
    // You could, of course, utilize willRotateToInterfaceOrientation instead for your subViews. 
}

- (void)viewWillAppear: (BOOL)animated { 

    // In my app I want to hide the status bar and navigation bar too. 
    // You may not want to do that. If so then skip the next two lines. 
    self.navigationController.navigationBar.barStyle = UIBarStyleBlackTranslucent;
    [[UIApplication sharedApplication] setStatusBarHidden:YES withAnimation:UIStatusBarAnimationSlide];

    [self hideTabBar: YES];

    // You may want to re-arrange your subviews here. 
    // Orientation may have changed while detail view controllers were visible. 
    // This method is called upon return from pushed and pulled view controllers.   

    return;
}

- (void)viewWillDisappear: (BOOL)animated {     

    // This method is called while this view controller is pulled
    // or when a sub view controller is pushed and becomes visible
    // Therefore the original settings for the tab bar, navigation bar and status bar need to be re-instated

    [self hideTabBar:NO];

    // If you did not change the appearance of the navigation and status bar in viewWillAppear,
    // then you can skip the next two statements too. 
    self.navigationController.navigationBar.barStyle = UIBarStyleBlack;
    [[UIApplication sharedApplication] setStatusBarHidden:NO withAnimation:UIStatusBarAnimationSlide];

    return;
}

The in-line comments should explain the reasoning for each statement. Though, there may be smarter ways of coding it.

There is one side effect in conjunction with hiding the status bar and navigation bar too, which I do not want to hide from you guys.
1. When returning from this navigation controller to the calling navigation controller then the status bar and navigation bar on the calling controller overlap until the device is rotated once or until the related tab has been choosen again after another tab came to front.
2. When the calling view controller is a table view and when the device is in landscape mode when returning to the table, then the table is displayed in the appropriate orientation for landscape but it is layed out as if it were portrait. The upper left corner is fine but some table cells plus tab bar are hidden beneath the screen. On the right hand side there is some free space. This, too, is fixed by rotating the device again.

I will keep you updated once I found solutions for these minor but nasty bugs.

世俗缘 2024-07-23 11:02:57

其工作原理如下:

Application Delegate 中,您创建 UITabBarController。 然后,您创建一个 UINavigationController ,并将其根控制器作为您想要在特定选项卡中使用的视图控制器。 然后将 UINavigationController 插入到 UITabBarController 的“viewControllers”数组中。 像这样:

ViewControllerForTab1 *tab1Controller = [[ViewControllerForTab1 alloc] initWithNibName:@"ViewControllerForTab1"];

UINavigationController *navController = [[UINavigationController alloc] initWithRootViewController:tab1Controller];

[tab1Controller release];


UITabBarController *tabBarController = [[UITabBarController alloc] init];
tabBarController.viewControllers = [NSArray arrayWithObjects: navController, nil];

[navController release];


[self.window addSubView:tabBarController.view];

这样,您可以在 UINavigationController 内的任何视图控制器中将“hidesBottomBarWhenPushed”属性设置为“YES”,它将隐藏UITabBar

希望有帮助!

Here's how you get this to work:

In the Application Delegate you create the UITabBarController. Then you create a UINavigationController with its root controller as the view controller you want in the particular tab. Then insert the UINavigationController into the "viewControllers" array of the UITabBarController. like so:

ViewControllerForTab1 *tab1Controller = [[ViewControllerForTab1 alloc] initWithNibName:@"ViewControllerForTab1"];

UINavigationController *navController = [[UINavigationController alloc] initWithRootViewController:tab1Controller];

[tab1Controller release];


UITabBarController *tabBarController = [[UITabBarController alloc] init];
tabBarController.viewControllers = [NSArray arrayWithObjects: navController, nil];

[navController release];


[self.window addSubView:tabBarController.view];

This way you can set the "hidesBottomBarWhenPushed" property to "YES" in any view controller inside that UINavigationController and it will hide the UITabBar.

Hope that helps!

最近可好 2024-07-23 11:02:57

我将在这里给出我的解决方案:

#define FRAME_HIDDEN CGRectMake(0, 0, 768, 1073) //1073 = 1024 (screen) + 49 (UITabBar) 
#define FRAME_APPEAR CGRectMake(0, 0, 768,1024)

-(void) setHidden: (BOOL) hidden{
    CGRect frame = (hidden)? FRAME_HIDDEN : FRAME_APPEAR;
    [self.tabBarController.view setFrame:frame];
    [self.tabBarController.tabBar setHidden:hidden];
}

在需要的地方调用“setHidden”方法! 我使用这个和“单例模式”,然后我的子视图可以隐藏他的超级视图中的 UITabBar

I'll let here my solution for this:

#define FRAME_HIDDEN CGRectMake(0, 0, 768, 1073) //1073 = 1024 (screen) + 49 (UITabBar) 
#define FRAME_APPEAR CGRectMake(0, 0, 768,1024)

-(void) setHidden: (BOOL) hidden{
    CGRect frame = (hidden)? FRAME_HIDDEN : FRAME_APPEAR;
    [self.tabBarController.view setFrame:frame];
    [self.tabBarController.tabBar setHidden:hidden];
}

Calls the 'setHidden' method where you need it! I using this and the 'Singleton Pattern', then my subviews can hide the UITabBar in his Superview

歌入人心 2024-07-23 11:02:57

事实证明,如果您设置视图 hidesBottomBarWhenPushed:YES 它会在视图出现时隐藏该栏(对我来说是废话)。 我将其分配给 UITabBarController,仔细想想,这并没有多大意义。

[self.view hidesBottomBarWhenPushed:YES];
[super pushViewController:viewController animated:animated];

It turns out that if you set the view hidesBottomBarWhenPushed:YES it hides the bar when the view appears (duh on my part). I was assigning it to the UITabBarController, which doesn't make too much sense when you think about it.

[self.view hidesBottomBarWhenPushed:YES];
[super pushViewController:viewController animated:animated];
℉絮湮 2024-07-23 11:02:57

在要隐藏的控制器中使用 hidesBottomBarWhenPushed

为了隐藏所有放入准备segue的控制器

override func prepare(for segue: UIStoryboardSegue, sender: Any?) {
    segue.destination.hidesBottomBarWhenPushed = true
}

Use hidesBottomBarWhenPushed in the controller that you want to hide.

For hide all controllers put into prepare for segue

override func prepare(for segue: UIStoryboardSegue, sender: Any?) {
    segue.destination.hidesBottomBarWhenPushed = true
}
难如初 2024-07-23 11:02:57

在第一个 UIViewController FirstItemViewController

@IBAction func pushToControllerAction(sender: AnyObject) {
  self.hidesBottomBarWhenPushed = true
  self.performSegueWithIdentifier("nextController", sender: self)
}

在下一个 UIViewController ExampleViewController

override func willMoveToParentViewController(parent: UIViewController?) {
  if parent == nil {
    var viewControllers = self.navigationController!.viewControllers
    if ((viewControllers[viewControllers.count - 2]).isKindOfClass(FirstItemViewController.self)) {
      (viewControllers[viewControllers.count - 2] as! FirstItemViewController).hidesBottomBarWhenPushed = false
    }
  }
}

看这个答案 https: //stackoverflow.com/a/36148064/3078925

in the first UIViewController FirstItemViewController

@IBAction func pushToControllerAction(sender: AnyObject) {
  self.hidesBottomBarWhenPushed = true
  self.performSegueWithIdentifier("nextController", sender: self)
}

in the next UIViewController ExampleViewController

override func willMoveToParentViewController(parent: UIViewController?) {
  if parent == nil {
    var viewControllers = self.navigationController!.viewControllers
    if ((viewControllers[viewControllers.count - 2]).isKindOfClass(FirstItemViewController.self)) {
      (viewControllers[viewControllers.count - 2] as! FirstItemViewController).hidesBottomBarWhenPushed = false
    }
  }
}

Look at this answer https://stackoverflow.com/a/36148064/3078925

~没有更多了~
我们使用 Cookies 和其他技术来定制您的体验包括您的登录状态等。通过阅读我们的 隐私政策 了解更多相关信息。 单击 接受 或继续使用网站,即表示您同意使用 Cookies 和您的相关数据。
原文